<?xml version="1.0" encoding="utf-8"?>
<feed xmlns="http://www.w3.org/2005/Atom">
    <id>https://okuno.se/blog/</id>
    <title>Oskar Okuno Blog</title>
    <updated>2026-04-06T05:34:02.835Z</updated>
    <generator>https://github.com/jpmonette/feed</generator>
    <author>
        <name>Oskar Okuno</name>
        <email>johndoe@example.com</email>
        <uri>https://okuno.se</uri>
    </author>
    <link rel="alternate" href="https://okuno.se/blog/"/>
    <link rel="self" href="https://okuno.se/blog/atom"/>
    <subtitle>Oskar Okuno is a Fullstack Dev experienced with React, React Native, Vue. As a Fullstack Dev he also uses Node.js, Go, Java and C#.</subtitle>
    <icon>https://okuno.se/blog/favicon.ico</icon>
    <rights>2022 Oskar Okuno</rights>
    <entry>
        <title type="html"><![CDATA[How to find Chromium Snapshot by Version]]></title>
        <id>https://okuno.se/blog/find-which-chromium-version-to-commit</id>
        <link href="https://okuno.se/blog/find-which-chromium-version-to-commit"/>
        <updated>2025-05-26T00:00:00.000Z</updated>
        <summary type="html"><![CDATA[When you want to run an old verson of Chrome]]></summary>
        <content type="html"><![CDATA[<p>NOTE: This article assumes you are using a M-Series MacBook which introduces the issue of running x86/amd software on an ARM based CPU.</p>
<p>When you want to run an old Chromium version on new hardware/OS you may run into some obsticles. First, you need to recreate the environment that this ancient code expects. Then you need to download the source code of Chromium and build it yourself. However, it's a pretty tidus and time consuming process, which is very well documented <a href="https://chromium.googlesource.com/chromium/src.git/+/HEAD/docs/building_old_revisions.md" rel="noopener noreferrer">here</a>.</p>
<p>A slightly faster way is to download a snapshot from the official: <a href="https://commondatastorage.googleapis.com/chromium-browser-snapshots/index.html" rel="noopener noreferrer">chromium-browser-snapshots</a>. This will skip the build step and cut the amount of enviornment setup needed. However, they are sorted by a mysterious number...</p>
<h2 id="snapshot--revision"><a class="anchor" aria-hidden="true" tabindex="-1" href="#snapshot--revision"></a>Snapshot = Revision</h2><p>The "snapshot number" is actually the <strong>revision</strong> number. So the challenge becomes: <em>How can I find out the revision number of the specific chrome version I am looking for?</em> This requires you to go through the source code where the major version corresponds to a tag which can lead you to a commit, which message has the revision number! Let the treasure hunt begin!</p>
<h2 id="case-study-find-v36"><a class="anchor" aria-hidden="true" tabindex="-1" href="#case-study-find-v36"></a>Case Study: Find v36</h2><p>From the <a href="https://chromium.googlesource.com/chromium/src/" rel="noopener noreferrer">source code</a> find the <a href="https://chromium.googlesource.com/chromium/src/+refs" rel="noopener noreferrer">Tag</a> that corresponds to the version you are looking for. There are usually a lot of tags for each MAJOR version. Click on one of the tags to see the source code tree at that point in time.</p>
<p><img src="img/chrome-version-blame.jpg" alt="Chrome Version Blame" width="561" height="360" /></p>
<p>Then you navigate to <code>src/chrome/VERSION</code>. This file shows you the version of Chrome at this point in time. Now, click "blame" and find the last commit that changed the major version. For this case it was this commit: <a href="https://chromium.googlesource.com/chromium/src/+/b1f8bdb570beade2a212e69bee1ea7340d80838e" rel="noopener noreferrer">b1f8bdb570beade2a212e69bee1ea7340d80838e</a></p>
<p>The commit message is where we will find the revision number:</p>
<pre><code>36 is the atomic number of krypton.
36 is both the square of 6 and a triangular number...

[...]

R=dharani@google.com, laforge@chromium.org

Review URL: https://codereview.chromium.org/218183002

git-svn-id: svn://svn.chromium.org/chrome/trunk/src@260368 0039d316-1c4b-4281-b951-d872f2087c98</code></pre><p>What we are looking for is on the last line after <em>...trunk/src@</em>: <code>260368</code>. This is the revision number! It seems like there is no strict format when it comes to specifying the revision number in the commit so it may look different for different commits. Now we can go to the snapshot folder of the specific architecture we are looking for (e.g. Linux_x64) and search for the revision number and then download the zip file with the chrome binary.</p>
<p>See source code <a href="https://github.com/MrOggy85/old-chrome-mac" rel="noopener noreferrer">here</a></p>
<h2 id="resources"><a class="anchor" aria-hidden="true" tabindex="-1" href="#resources"></a>Resources</h2><ul>
<li><a href="https://stackoverflow.com/questions/61274601/how-to-find-out-in-which-chromium-version-a-commit-was-shipped" rel="noopener noreferrer">https://stackoverflow.com/questions/61274601/how-to-find-out-in-which-chromium-version-a-commit-was-shipped</a></li>
<li><a href="https://medium.com/dot-debug/running-chrome-in-a-docker-container-a55e7f4da4a8" rel="noopener noreferrer">https://medium.com/dot-debug/running-chrome-in-a-docker-container-a55e7f4da4a8</a></li>
</ul>
]]></content>
    </entry>
    <entry>
        <title type="html"><![CDATA[What Does Gravity Actually Look Like?]]></title>
        <id>https://okuno.se/blog/what-does-gravity-actually-look-like</id>
        <link href="https://okuno.se/blog/what-does-gravity-actually-look-like"/>
        <updated>2025-04-24T00:00:00.000Z</updated>
        <summary type="html"><![CDATA[You know how gravity is usually explained with that downwards funnel? A 2D grid, then someone plops a big bowling ball on it, and suddenly it's all marbles spinning into it. That analogy gets shown in every pop-science explainer ever — and for years, it totally threw me off.]]></summary>
        <content type="html"><![CDATA[<p>You know how gravity is usually explained with that downwards funnel? A 2D grid, then someone plops a big bowling ball on it, and suddenly it's all marbles spinning into it. That analogy gets shown in every pop-science explainer ever — and for years, it totally threw me off.</p>
<p>So I dug in. Here's what finally made gravity click for me.</p>
<h2 id="the-funnel-is-lying-to-you-sort-of"><a class="anchor" aria-hidden="true" tabindex="-1" href="#the-funnel-is-lying-to-you-sort-of"></a>The Funnel Is Lying to You (Sort of)</h2><p>The Funnel analogy tries to explain how a massive object like the Sun "bends" space so that smaller objects, like planets, move around it. But there are problems. It uses gravity (pulling down into the funnel) to explain gravity, which is a bit of a loop. Furthermore, the funnel is 2D. The Sun is a 3D ball. So why does the ball sink downward? Why not toward the Sun itself? And Earth isn't spiraling into the Sun like a marble down a funnel, so what gives?</p>
<p>The analogy is simple, but also misleading. It shows some effects, but hides the real structure underneath.</p>
<h2 id="space-isnt-nothing-its-a-stage-with-rules"><a class="anchor" aria-hidden="true" tabindex="-1" href="#space-isnt-nothing-its-a-stage-with-rules"></a>Space Isn't Nothing. It's a Stage with Rules.</h2><p>We think of space as "nothing," but it''s actually something — a structure with properties. It has distances, directions, and time. And it has geometry — meaning it can be curved, warped, or stretched.</p>
<p>Even in a total vacuum, light still travels at a constant speed, clocks still tick, and you can measure how far something is. So this "nothing" has a shape — and that shape is affected by mass and energy.</p>
<h2 id="gravity-is-geometry-not-force"><a class="anchor" aria-hidden="true" tabindex="-1" href="#gravity-is-geometry-not-force"></a>Gravity Is Geometry, Not Force</h2><p>Here's what Einstein figured out:</p>
<ul>
<li>Mass and energy <em>curve</em> spacetime.</li>
<li>Objects move along the <em>straightest path</em> through this curved spacetime.</li>
</ul>
<p>That's it! No invisible rope pulling things in. Just geometry changing the rules of motion.</p>
<p>A planet orbiting the Sun isn't being yanked by a force — it's moving in a straight line through a curved space. It looks like an orbit, but it's really just the planet following the <em>bend</em> in spacetime.</p>
<h2 id="the-funnel-analogy--with-a-twist"><a class="anchor" aria-hidden="true" tabindex="-1" href="#the-funnel-analogy--with-a-twist"></a>The Funnel Analogy — with a Twist</h2><p>Let's revisit the funnel analogy — but modify it.</p>
<p>Yes, imagine a funnel — but now copy that funnel in every possible direction, forming a spherical warp around the mass. Instead of one drain in the middle, you've got a 3D pit from all angles.</p>
<p>Even better: imagine being inside this warping. No slope to fall down, just space itself bending around you.</p>
<p><strong>The Earth doesn't orbit the Sun because it's falling down a slope. It orbits because its straight-line path loops around inside this 3D curvature.</strong></p>
<h2 id="bonus-what-would-gravity-look-like-if-you-could-see-it"><a class="anchor" aria-hidden="true" tabindex="-1" href="#bonus-what-would-gravity-look-like-if-you-could-see-it"></a><em>Bonus:</em> What Would Gravity Look Like If You Could See It?</h2><p>It'd be wild.</p>
<p>Imagine being able to see invisible wind patterns — not just wind on a surface, but in every direction. Gravity would look like <strong>smooth curves</strong> near stable systems (planets, stars). <strong>Swirling warps</strong> and eddies where fields overlap (like the Earth–Moon–Sun system). <strong>Ripples</strong> spreading out when massive events happen (like black holes colliding — gravitational waves).</p>
<p>Each massive object would be like a stirring spoon in a cosmic fluid, and every smaller object would be caught in the flows.</p>
<h2 id="speed-doesnt-change-the-curvature--just-how-you-move-through-it"><a class="anchor" aria-hidden="true" tabindex="-1" href="#speed-doesnt-change-the-curvature--just-how-you-move-through-it"></a>Speed Doesn't Change the Curvature — Just How You Move Through It</h2><p>One final piece: the shape of the gravity field (spacetime curvature) comes from the mass and energy — not from how fast you're moving. Your speed just determines your path through that shape.</p>
<p>So a satellite with just the right speed can loop endlessly in orbit. One with too little speed falls back. One with too much speed escapes. The terrain doesn't change — only your route through it does.</p>
<h2 id="finally-so-what-is-gravity"><a class="anchor" aria-hidden="true" tabindex="-1" href="#finally-so-what-is-gravity"></a><em>Finally:</em> So What Is Gravity?</h2><p>It's not a force pulling stuff down.
It's the shape of space and time, telling everything how to move.
And if we could see it, it wouldn't be a clean grid with one funnel — it'd be a chaotic, rippling, warping ocean of invisible geometry.</p>
<pre><code>Strangely beautiful.
Still very hard to debug.</code></pre>]]></content>
    </entry>
    <entry>
        <title type="html"><![CDATA[Corepack Gotchas with pnpm in Docker]]></title>
        <id>https://okuno.se/blog/corepack-gotchas-with-pnpm-in-docker</id>
        <link href="https://okuno.se/blog/corepack-gotchas-with-pnpm-in-docker"/>
        <updated>2025-04-08T00:00:00.000Z</updated>
        <summary type="html"><![CDATA[Security can sometimes blow up in your face]]></summary>
        <content type="html"><![CDATA[<p>While working on a Docker setup for a Node.js project, I ran into a couple of subtle Corepack issues that are worth noting.</p>
<h1 id="bypassing-the-corepack-is-about-to-download-prompt"><a class="anchor" aria-hidden="true" tabindex="-1" href="#bypassing-the-corepack-is-about-to-download-prompt"></a>Bypassing the “Corepack is about to download” Prompt</h1><p>When running corepack inside Docker, it pauses with a prompt asking to download the package manager. Not ideal for automated builds. The fix is simple.
Setting <code>COREPACK_ENABLE_DOWNLOAD_PROMPT=0</code> skips the download prompt and keeps things smooth in CI or Docker contexts.</p>
<pre><code>RUN corepack enable &amp;&amp; corepack install --global pnpm@9.8.0
ENV COREPACK_ENABLE_DOWNLOAD_PROMPT=0</code></pre><p><a href="https://github.com/nodejs/corepack/issues/550" rel="noopener noreferrer">source</a></p>
<h1 id="cannot-find-matching-keyid-error"><a class="anchor" aria-hidden="true" tabindex="-1" href="#cannot-find-matching-keyid-error"></a>“Cannot find matching keyid” Error</h1><p>While installing pnpm, Corepack threw a cryptic error:</p>
<pre><code>throw new Error(`Cannot find matching keyid: ${JSON.stringify({ signatures, keys })}`);</code></pre><p>tl;dr: use latest corepack</p>
<p>The signing keys in NPM were rotated and newly signed releases from pnpm caused Corepack to fail verification. In order to fix it you need to use Corepack <code>&gt;0.31.0</code> to install and run pnpm without it crashing (due to verify signature failure).</p>
<p><a href="https://stackoverflow.com/questions/79411275/after-heroku-restart-pnpm-error-cannot-find-matching-keyid" rel="noopener noreferrer">source</a></p>
<p>Here is the full error for context:</p>
<pre><code>/usr/local/lib/node_modules/corepack/dist/lib/corepack.cjs:22688
    throw new Error(`Cannot find matching keyid: ${JSON.stringify({ signatures, keys })}`);
          ^

Error: Cannot find matching keyid: {"signatures":[{"sig":"MEUCIQDI3E/8ZodnpZKAfKTeYe/+IF1wyawkKwK+0AkZodyJ9AIgQnQWC/XFtaz7eGusq5QPkYO0Vb412MsQcqxhadZ8IoA=","keyid":"SHA256:DhQ8wR5APBvFHLF/+Tc+AYvPOdTpcIDqOhxsBHRwC7U"}],"keys":[{"expires":null,"keyid":"SHA256:jl3bwswu80PjjokCgh0o2w5c2U4LhQAE57gj9cz1kzA","keytype":"ecdsa-sha2-nistp256","scheme":"ecdsa-sha2-nistp256","key":"MFkwEwYHKoZIzj0CAQYIKoZIzj0DAQcDQgAE1Olb3zMAFFxXKHiIkQO5cJ3Yhl5i6UPp+IhuteBJbuHcA5UogKo0EWtlWwW6KSaKoTNEYL7JlCQiVnkhBktUgg=="}]}
    at verifySignature (/usr/local/lib/node_modules/corepack/dist/lib/corepack.cjs:22688:11)</code></pre>]]></content>
    </entry>
    <entry>
        <title type="html"><![CDATA[When JavaScript Gets Too Bare]]></title>
        <id>https://okuno.se/blog/When-JavaScript-Gets-Too-Bare</id>
        <link href="https://okuno.se/blog/When-JavaScript-Gets-Too-Bare"/>
        <updated>2025-04-07T00:00:00.000Z</updated>
        <summary type="html"><![CDATA[A Developer’s Perspective on the Bare Runtime]]></summary>
        <content type="html"><![CDATA[<p>I recently came across <a href="https://bare.pears.com/" rel="noopener noreferrer">Bare</a>, a new JavaScript runtime that takes minimalism to the extreme. It’s designed to let you “run JavaScript everywhere,” but without the bells and whistles of Node.js or Deno.</p>
<p>First reaction? Intrigued then skeptical.</p>
<h1 id="javascript-is-great---because-its-easy"><a class="anchor" aria-hidden="true" tabindex="-1" href="#javascript-is-great---because-its-easy"></a>JavaScript Is Great - Because It’s Easy</h1><p>JavaScript (and TypeScript) continues to be my go-to language for many things. Not because it’s perfect, but because it’s simple and productive. The tooling, the ecosystem, and the fact that you can go from idea to prototype in a few minutes is powerful. It’s not the fastest or most efficient language, but with modern engines like V8, it’s good enough for most web and backend apps.</p>
<p>Then enters Bare — essentially a JavaScript runtime without a standard library. No <code>fs</code>, no <code>net</code>, no <code>fetch</code>, no built-in utilities. It’s just you, your JS code, and a JavaScript engine like V8 (which you are responsible for integrating).</p>
<p><em>So what’s the point?</em></p>
<h1 id="how-bare-is-it"><a class="anchor" aria-hidden="true" tabindex="-1" href="#how-bare-is-it"></a>How Bare Is It</h1><p>To understand where Bare fits, you have to look at what it’s trying to be:</p>
<ul>
<li>Not batteries-included: Unlike Node.js or Deno, Bare gives you nothing by default. You must define the runtime environment yourself.</li>
<li>Highly modular: You decide what goes in, making it ideal for small, focused deployments.</li>
<li>Cross-platform focused: It aims to run JavaScript in places JS usually doesn’t go—low-spec devices, embedded systems, mobile runtimes, and more.</li>
</ul>
<p>In that light, it starts to make sense. Bare isn’t trying to be your daily driver. It’s for when you want just enough JavaScript to get the job done and have full control over what’s included and how it behaves.</p>
<h1 id="lets-talk-tradeoffs"><a class="anchor" aria-hidden="true" tabindex="-1" href="#lets-talk-tradeoffs"></a>Let’s Talk Tradeoffs</h1><p>Here’s where the pragmatist in me kicks in.</p>
<p>If I’m using JavaScript because it’s easy and fast to work with, then Bare removes much of what makes it appealing. I don't want to care about C and low-level systems when writing Javascript.</p>
<p>At that point, the question becomes clear:</p>
<blockquote>
<p>If you have the knowledge and skill to go this low-level just to get JavaScript running, why not just use Golang?</p>
</blockquote>
<h1 id="why-golang-is-often-a-better-fit"><a class="anchor" aria-hidden="true" tabindex="-1" href="#why-golang-is-often-a-better-fit"></a>Why Golang Is Often a Better Fit</h1><p>Golang offers a compelling alternative:</p>
<ul>
<li>Compiles to native code (no VM, no runtime)</li>
<li>rich standard library</li>
<li>low cpu and memory usage</li>
</ul>
<p>For most real-world apps that need to run on low-resource environments (think IoT devices, routers, small VMs), Go gives you all the control you need—with the productivity and ecosystem that Bare is intentionally missing.</p>
<h1 id="so-when-is-bare-a-good-fit"><a class="anchor" aria-hidden="true" tabindex="-1" href="#so-when-is-bare-a-good-fit"></a>So When Is Bare a Good Fit?</h1><p>To be fair, Bare does have a niche. It might be the right choice if you have an existing JS codebase you want to port to a constrained environment. Instead of rewriting the business logic you can rewrite the underlying platform. whatever makes more sense for your project.</p>
<p>In that case, Bare is a great tool because it’s so minimal.</p>
<h1 id="final-thoughts"><a class="anchor" aria-hidden="true" tabindex="-1" href="#final-thoughts"></a>Final Thoughts</h1><p>Tools like Bare are important, not because everyone should use them, but because they push the boundaries of what’s possible. They give us control and minimalism when we really need it, even if it comes at the cost of convenience and developer experience.</p>
<p>But for most developers looking to build reliable, efficient applications, especially in constrained environments, languages like Go are simply more practical. Bare removes the comfort that makes JavaScript appealing, and unless you’re deeply invested in JS or working in very specific contexts, you’re probably better off using a tool designed for that space from the start.</p>
<p>At the end of the day, the tool doesn’t matter as much as the outcome. Choose what makes sense, not what’s trendy. Bare is fascinating — but for me, and probably many others, it’s a sharp tool for a narrow job.</p>
]]></content>
    </entry>
    <entry>
        <title type="html"><![CDATA[Syncthing Discovery Server in Docker with Caddy]]></title>
        <id>https://okuno.se/blog/syncthing-discovery-server-in-docker-with-caddy</id>
        <link href="https://okuno.se/blog/syncthing-discovery-server-in-docker-with-caddy"/>
        <updated>2023-07-28T00:00:00.000Z</updated>
        <summary type="html"><![CDATA[On a journey to discover your own infrastructure]]></summary>
        <content type="html"><![CDATA[<h2 id="why-run-your-own-discovery-server"><a class="anchor" aria-hidden="true" tabindex="-1" href="#why-run-your-own-discovery-server"></a>Why run your own Discovery Server?</h2><p>Short answer: Well, why not? Self hosting! Slightly longer answer: In theory it
could speed up client discovery since you don't need to query the same
instance(s) as everyone else on the planet. And it can also be more secure to
opt out of the global discovery server and only rely on your own server to make
your digital footprint slightly smaller. The official guide can be found
<a href="https://docs.syncthing.net/users/stdiscosrv.html" rel="noopener noreferrer">here</a>. Here is further
reading on the
<a href="https://docs.syncthing.net/users/security.html" rel="noopener noreferrer">security behind the Syncthing infrastructure</a>.</p>
<h2 id="1-run-discovery-server-as-docker-container"><a class="anchor" aria-hidden="true" tabindex="-1" href="#1-run-discovery-server-as-docker-container"></a>1. Run Discovery Server as Docker Container</h2><p>The docker container can be found in Docker Hub under the
name<a href="https://hub.docker.com/r/syncthing/discosrv" rel="noopener noreferrer">syncthing/discosrv</a>. I am
running it using the following bash script:</p>
<pre><code>NAME=syncthing-discovery-server
VERSION=1.23.6

docker run \
  --name $NAME \
  -d \
  -p 127.0.0.1:8443:8443 \
  --restart=unless-stopped \
  --network shared_docker-network \
  syncthing/discosrv:$VERSION -http \</code></pre><p>Note that I am adding this container to a specific network and I am only
exposing the port to localhost. In this network I am also running a caddy server
which will be running a reverse proxy and handling the TLS/HTTPS requests. The
discovery server needs TLS in order to operate securely. Since I am lazy I will
use Caddy to solve this issue for me. All I need to do is to setup an A or CNAME
record which points to my server and Caddy handles the certificates.</p>
<h2 id="2-setup-caddy-as-reverse-proxy"><a class="anchor" aria-hidden="true" tabindex="-1" href="#2-setup-caddy-as-reverse-proxy"></a>2. Setup Caddy as Reverse Proxy</h2><p>As mentioned above, Caddy will handle TLS. The following Caddyfile will reverse
proxy all request with <em>your.server.com</em> to the Syncthing Discover Server
running as a Docker Container in the same Docker network as the
<a href="../caddy-in-docker-with-common-log" rel="noopener noreferrer">Caddy Docker Container</a>. This Caddyfile is
inspired by this old
<a href="https://github.com/syncthing/docs/issues/631#issuecomment-814730466" rel="noopener noreferrer">Github comment</a>.
But, one of the header is outdated now. The new <code>header_up</code> line to be used is:
<code>header_up X-Tls-Client-Cert-Der-Base64 {http.request.tls.client.certificate_der_base64}</code>.
This is pointed out in a
<a href="https://github.com/caddyserver/caddy/pull/4241#issuecomment-1328171418" rel="noopener noreferrer">newer comment on a PR</a>.
Please see the whole file below</p>
<pre><code>your.server.com {
  reverse_proxy syncthing-discovery-server:8443 {
    header_up X-Forwarded-For {http.request.remote.host}
    header_up X-Client-Port {http.request.remote.port}
    header_up X-Tls-Client-Cert-Der-Base64 {http.request.tls.client.certificate_der_base64}
  }

  tls {
    client_auth {
      mode request
    }
  }
}</code></pre><h2 id="3-point-your-syncthing-client-to-your-discovery-server"><a class="anchor" aria-hidden="true" tabindex="-1" href="#3-point-your-syncthing-client-to-your-discovery-server"></a>3. Point your Syncthing Client to your Discovery Server</h2><p>Go to <code>Settings &gt; Connections &gt; Global Discovery Servers</code> and make a comma and
add the full URL (e.g. <a href="https://your.server.com" rel="noopener noreferrer">https://your.server.com</a>) to your Discovery Server. DONE!</p>
<h2 id="notable-mention---t4skforce"><a class="anchor" aria-hidden="true" tabindex="-1" href="#notable-mention---t4skforce"></a>Notable mention - t4skforce</h2><p>Before we start, I did not try the docker image
<a href="https://hub.docker.com/r/t4skforce/syncthing-discovery" rel="noopener noreferrer">t4skforce/syncthing-discovery</a>
([Github(<a href="https://github.com/t4skforce/syncthing-discovery)]" rel="noopener noreferrer">https://github.com/t4skforce/syncthing-discovery)]</a>). This image also
runs the Discovery Server with a reverse proxy, but you still need to provide
the SSL certificate yourself.</p>
<h2 id="versions"><a class="anchor" aria-hidden="true" tabindex="-1" href="#versions"></a>Versions</h2><p>This writeup was using the following versions for the included software</p>
<ul>
<li>Syncthing <code>1.23.6</code></li>
<li>Caddy <code>2.6.2</code></li>
</ul>
<h2 id="resources"><a class="anchor" aria-hidden="true" tabindex="-1" href="#resources"></a>Resources</h2><ul>
<li><a href="https://docs.syncthing.net/users/stdiscosrv.html" rel="noopener noreferrer">Manual</a></li>
</ul>
]]></content>
    </entry>
    <entry>
        <title type="html"><![CDATA[Rocket.chat and MongoDB (not) on an RPi4]]></title>
        <id>https://okuno.se/blog/rocket-chat-mongodb-raspberry-pi-arm</id>
        <link href="https://okuno.se/blog/rocket-chat-mongodb-raspberry-pi-arm"/>
        <updated>2023-05-10T00:00:00.000Z</updated>
        <summary type="html"><![CDATA[Failing to run a chat program on an ARM processor]]></summary>
        <content type="html"><![CDATA[<p>I tried to install <a href="http://Rocket.chat" rel="noopener noreferrer">Rocket.chat</a> today but failed/gave up
due to hardware limitations with RPi4 (Raspberry
Pi 4)<sup><a href="#1">[1]</a></sup>. However
<a href="https://en.wiktionary.org/wiki/TIL" rel="noopener noreferrer">TIL</a> about ARM instruction set (micro
server architecture) in the process.</p>
<h2 id="first-boss-mongodb"><a class="anchor" aria-hidden="true" tabindex="-1" href="#first-boss-mongodb"></a>First Boss: MongoDb</h2><p>The problem began when I was trying to get MongoDb running on the RPi4. Not the
latest version, but recent version would not start. After a while I understood
that MongoDb targets a
<a href="https://github.com/docker-library/mongo/issues/510#issuecomment-970862957" rel="noopener noreferrer">minimum instruction set of (<code>ARMv8.2-A</code>)</a>
which is later instruction set than what
<a href="https://en.wikipedia.org/wiki/Raspberry_Pi#Specifications" rel="noopener noreferrer">RPi4 implements (<code>ARMv8-A</code>)</a>.
However I could still run a previous version of the major 4 version (<code>4.2.18</code>)
which was before the switch (as of writing <code>6.0.5</code> is the latest version)
However this solution is not very future proof and probably means that updating
Rocket.chat is limited.</p>
<h2 id="second-boss-rocketchat-spoiler-alert-game-over"><a class="anchor" aria-hidden="true" tabindex="-1" href="#second-boss-rocketchat-spoiler-alert-game-over"></a>Second Boss: Rocket.Chat (spoiler alert: Game Over)</h2><p>After MongoDB was up and running my focus shifted to
<a href="http://rocket.chat" rel="noopener noreferrer">rocket.chat</a> itself where I ran into the <em>same</em> issue.
There were no support for ARM when running the latest version Rocket.chat. I
thought it was a bit weird since it’s just a node.js program... However there is
a 3 year old half decent instruction to run an older version,
<a href="https://github.com/RocketChat/Rocket.Chat.Embedded.arm64" rel="noopener noreferrer">but it wasn’t working out of the box</a>.
After some searching on their GitHub issues and their website forum I realized
that ARM support was not a priority nor something the core team was interested
in.</p>
<h2 id="side-quest-mini-pc"><a class="anchor" aria-hidden="true" tabindex="-1" href="#side-quest-mini-pc"></a>Side Quest: Mini-PC</h2><p>As a side quest I started looking into mini-pc since I remember a
<a href="https://news.ycombinator.com/item?id=35831087" rel="noopener noreferrer">comment on hacker news</a> giving a
tip about
<a href="https://store.mele.cn/products/mele-fanless-mini-pc-quieter3q-n5105-windows-11-pro-micro-computer-8gb-ddr4-256gb-rom-small-desktop-computers-for-office-home-dual-hdmi-4k-60hz-bt5-2-wi-fi-6-usb3-0-ethernet-port-vesa-mount" rel="noopener noreferrer">MeLe Quieter3Q</a>
(intel N5105 processor). It costs <code>¥35.000</code>-<code>¥40.000</code> which is more than double
the RPi4 (there are cheaper mini-pc but they have a loud fan) but it’s a x86-64
processor which just makes everything so much easier for server development...
What makes this something interesting is that the wattage is supposed to be very
similar to RPi4 which is one of the main reasons I went for the RPi4 as my home
server solution, while also having a virtual (x86-x64) server at Digital Ocean
as my main server.</p>
<p>RPi4 - 5W (idle 3W) source:
<a href="https://www.pidramble.com/wiki/benchmarks/power-consumption" rel="noopener noreferrer">source1</a>,
<a href="https://www.reddit.com/r/homeassistant/comments/li1f8c/pi4_vs_mini_pc/" rel="noopener noreferrer">source2</a></p>
<p>Quieter3Q - 11W (idle 3W) source:
<a href="https://www.cnx-software.com/2022/06/03/mele-quieter3q-review-ultra-thin-fanless-mini-pc-tested-with-windows-11-ubuntu-22-04/" rel="noopener noreferrer">source1</a></p>
<p>At this very moment I don’t have the need (nor the time #dad) to tinker with a
mini PC but it’s definitely something to note for future needs.</p>
<h2 id="footnotes"><a class="anchor" aria-hidden="true" tabindex="-1" href="#footnotes"></a>Footnotes</h2><h3 id="1"><a class="anchor" aria-hidden="true" tabindex="-1" href="#1"></a>1.</h3><ul>
<li><a href="https://github.com/RocketChat/Rocket.Chat/issues/27305" rel="noopener noreferrer">arm64 Docker images</a></li>
<li><a href="https://github.com/RocketChat/Rocket.Chat/issues/23722" rel="noopener noreferrer">Outdated snap packages for armhf and arm64</a></li>
</ul>
]]></content>
    </entry>
    <entry>
        <title type="html"><![CDATA[Caddy in Docker with Local Time]]></title>
        <id>https://okuno.se/blog/caddy-in-docker-with-local-time</id>
        <link href="https://okuno.se/blog/caddy-in-docker-with-local-time"/>
        <updated>2022-11-21T00:00:00.000Z</updated>
        <summary type="html"><![CDATA[When you want to log in your time zone]]></summary>
        <content type="html"><![CDATA[<h2 id="caddy-does-not-ship-tzdata"><a class="anchor" aria-hidden="true" tabindex="-1" href="#caddy-does-not-ship-tzdata"></a>Caddy does <em>not</em> ship <code>tzdata</code></h2><p>Apparently Caddy does not read the <code>TZ</code> enviornment variable. See:
<a href="https://caddy.community/t/set-timezone-for-caddy-2-official-docker-image/8622" rel="noopener noreferrer">https://caddy.community/t/set-timezone-for-caddy-2-official-docker-image/8622</a></p>
<p>In order to get logs in local time you need to
<a href="https://github.com/caddyserver/xcaddy" rel="noopener noreferrer">build your own image</a>. I started
building my own <code>Dockerfile</code> in the blog post:
<a href="caddy-in-docker-with-common-log" rel="noopener noreferrer">Caddy in Docker with common_log</a>. This is what
we need to add in order for <code>TZ</code> env var to work:</p>
<pre><code>RUN apk add --no-cache tzdata</code></pre><p>Which makes the full <code>Dockerfile</code>:</p>
<pre><code>ARG VERSION=2.6.2

FROM caddy:${VERSION}-builder AS builder

RUN xcaddy build \
  --with github.com/caddyserver/transform-encoder

FROM caddy:${VERSION}

RUN apk add --no-cache tzdata # &lt;-- ADD THIS

COPY --from=builder /usr/bin/caddy /usr/bin/caddy</code></pre><h2 id="forking-and-modifying-transform-encoder"><a class="anchor" aria-hidden="true" tabindex="-1" href="#forking-and-modifying-transform-encoder"></a>Forking and modifying <code>transform-encoder</code></h2><p><em>Section spoiler: This was a dead end :)</em></p>
<p>I <a href="https://github.com/MrOggy85/transform-encoder" rel="noopener noreferrer">forked</a> the
<code>transform-encoder</code> repo and hardcoded <code>TimeLocal = True</code>. I think it was a fun
exercise to write some <a href="https://go.dev/learn/" rel="noopener noreferrer">Go</a> which I don't do so often. I
could successfully make the change and then tried to build a new caddy image.
However, I ran into an error:</p>
<pre><code>module declares its path as: github.com/caddyserver/transform-encoder
        but was required as: github.com/MrOggy85/transform-encoder</code></pre><p>In order to replace the module with your fork you need to write your Dockerfile
using <code>=</code> like this:</p>
<pre><code>RUN xcaddy build \
  --with github.com/caddyserver/transform-encoder=github.com/MrOggy85/transform-encoder@master</code></pre><p>I was finally able to build a new caddy image, ran it, but no change... Back to
Whoogle and I finally found out what I statated in the beginning of this post,
that you just need to add/install <code>tzdata</code>.</p>
<h2 id="tldr"><a class="anchor" aria-hidden="true" tabindex="-1" href="#tldr"></a>tl;dr</h2><p>Here is the image if you want to use it right away:</p>
<pre><code>docker pull mroggy85/caddy:2.6.2</code></pre><p>See my Docker Hub Page: <a href="https://hub.docker.com/r/mroggy85/caddy" rel="noopener noreferrer">https://hub.docker.com/r/mroggy85/caddy</a></p>
]]></content>
    </entry>
    <entry>
        <title type="html"><![CDATA[Passwords - How to store salt?]]></title>
        <id>https://okuno.se/blog/passwords-how-to-store-salt</id>
        <link href="https://okuno.se/blog/passwords-how-to-store-salt"/>
        <updated>2022-11-10T00:00:00.000Z</updated>
        <summary type="html"><![CDATA[TI(r)L (Today I really Learned) how (and why) to store salt.]]></summary>
        <content type="html"><![CDATA[<p>This is the
<a href="https://security.stackexchange.com/questions/17421/how-to-store-salt" rel="noopener noreferrer">link</a> for
the full read.</p>
<blockquote>
<p>TL;DR - You can store the salt in plaintext without any form of obfuscation or
encryption, but don't just give it out to anyone who wants it.</p>
<p><a href="https://security.stackexchange.com/a/17435/70970" rel="noopener noreferrer">Polynomial</a></p>
</blockquote>
<p>The reason we want to salt the password is to make it <em>harder</em> for an attacker
to crack the passwords, <strong>once the DB has been comprimised</strong>. When the password
has been encrypted with the salt, an attacker can't use a
<a href="http://en.wikipedia.org/wiki/Rainbow_table" rel="noopener noreferrer">rainbow table</a>. This means that the
attacker needs to spend a lot of time decrypting the passwords. This gives you
time to detect the breach and reset all the passwords.</p>
<p>Read the full answer <a href="https://security.stackexchange.com/a/17435/70970" rel="noopener noreferrer">here</a>
for a full technical deep dive.</p>
]]></content>
    </entry>
    <entry>
        <title type="html"><![CDATA[Postgres HTTP proxy]]></title>
        <id>https://okuno.se/blog/postgres-http-proxy</id>
        <link href="https://okuno.se/blog/postgres-http-proxy"/>
        <updated>2022-09-25T00:00:00.000Z</updated>
        <summary type="html"><![CDATA[Lightweight HTTP proxy for sending SQL commands to a Postgres DB]]></summary>
        <content type="html"><![CDATA[<h2 id="the-narrow-usage-case"><a class="anchor" aria-hidden="true" tabindex="-1" href="#the-narrow-usage-case"></a>The (narrow) usage case</h2><p>You are hacking away on a personal website using React or any other SPA
technology. You also need to write a backend service to connect to your DB in
order to persist your data across your different devices and client. However,
imagine if you could just use a general backend to directly connect to your DB?</p>
<h2 id="how"><a class="anchor" aria-hidden="true" tabindex="-1" href="#how"></a>How?</h2><p>Deploy a HTTP server that accepts POST requests with a JSON body. The body needs
to include the credentials and location of your DB as well as the SQL you want
to execute. Then you just connect to the DB using the credentials from the
request and execute the query. Return the result and you are done.</p>
<h2 id="usage-example"><a class="anchor" aria-hidden="true" tabindex="-1" href="#usage-example"></a>Usage Example</h2><p>It's very convenient to use for a web client. See this example using <code>axios</code>:</p>
<pre><code>type PostgresProxyResponse = {
  command: "SELECT";
  query: unknown;
  rowCount: number;
  rows: any[][];
};

async function request(q: string) {
  const response = await axios({
    url: "/",
    baseURL: HTTP_ADDRESS_OF_ADEPLOYED_API,
    method: "POST",
    data: {
      u: "DB_USER",
      pw: "DB_PASSWORD",
      h: "DB_HOST",
      port: "DB_PORT",
      db: "DB_NAME",
      q: "SELECT * FROM table",
    },
  });

  return response.data;
}</code></pre><h2 id="security-concerns"><a class="anchor" aria-hidden="true" tabindex="-1" href="#security-concerns"></a>Security concerns</h2><p>This is a short-cut solution for personal web projects to enable rapid
development. This assumes you are consuming a Postgres DB that is open to the
internet. If you are developing a web service for other users, it means that
they need to establish connection to their own DB. Otherwise you need to include
the DB credentials (in plaintext) for all users to see.</p>
<p>Needles to say, since this solution pushes the DB credentials down to the
client, it's not a very secure solution, unless you trust the client, since you
wrote it yourself.</p>
<p>Another issue is that you need to run your own proxy to be safe. Right now I am
not logging the credentials, but it's easy for a malicient service to store your
crentials. Also, since you are sending your DB credentials over the wire, make
sure it's HTTPS!</p>
<h2 id="performance-concerns"><a class="anchor" aria-hidden="true" tabindex="-1" href="#performance-concerns"></a>Performance concerns</h2><p>The API is static, which means it will open and close a DB connection for each
request. Therefor it adds extra latency. Another performance concern is the
multiple protocols involved and data tranformation happening for each SQL
command. With that said, this is obviously not a perforant nor a scalable
technical solution. However, for the very small scale it's intended for it's
suffice.</p>
<p>This is very handy if you like your website to be able to send SQL commands
directly to the DB. It's very useful for small personal projects. But, it's
definitly not recommended for any service with multiple users because of obvious
security concerns. Please use it at your own risk.</p>
<h2 id="take-away"><a class="anchor" aria-hidden="true" tabindex="-1" href="#take-away"></a>Take away</h2><p>This is far from rocket science, and someone probably already created this.
However, I didn't find this solution after some (Brave) searching so I wrote it
instead.</p>
<p>See Github: <a href="https://github.com/MrOggy85/postgres-proxy" rel="noopener noreferrer">https://github.com/MrOggy85/postgres-proxy</a></p>
]]></content>
    </entry>
    <entry>
        <title type="html"><![CDATA[Caddy in Docker with common_log]]></title>
        <id>https://okuno.se/blog/caddy-in-docker-with-common-log</id>
        <link href="https://okuno.se/blog/caddy-in-docker-with-common-log"/>
        <updated>2022-07-14T00:00:00.000Z</updated>
        <summary type="html"><![CDATA[When you just want a simple log]]></summary>
        <content type="html"><![CDATA[<p>As of Caddy <a href="https://github.com/caddyserver/caddy/releases/tag/v2.5.0" rel="noopener noreferrer">v2.5.0</a>
they have <em>"removed the deprecated <code>common_log</code> field from HTTP access logs, and
the <code>single_field</code> encoder."</em>. For me as a casual user of Caddy who mostly just
looks at logs this is inconvenient. I don't use any tools to analyse json files
for automation, maybe I should? However, the good folks at Caddy doesn't leave
us high and dry. <em>"If you relied on this, you may use the
<a href="https://github.com/caddyserver/transform-encoder" rel="noopener noreferrer"><code>transform encoder plugin</code></a>
to encode logs in Common Log format."</em>. But, since I am using Docker the version
of Caddy I pull down from Docker Hub does not have this plugin available...
Enter the builder.</p>
<p>According to
<a href="https://hub.docker.com/_/caddy/" rel="noopener noreferrer">Caddy's official Docker Hub documentation</a>, we
need to create our own
<a href="https://docs.docker.com/engine/reference/builder/" rel="noopener noreferrer">Dockerfile</a> with the builder
image (<code>caddy:builder</code>) and then create our <strong>own</strong> Caddy image.</p>
<p>This is how the Dockerfile looks like:</p>
<pre><code>ARG VERSION=2.5.2

FROM caddy:${VERSION}-builder AS builder

RUN xcaddy build \
  --with github.com/caddyserver/transform-encoder

FROM caddy:${VERSION}

COPY --from=builder /usr/bin/caddy /usr/bin/caddy</code></pre><p>The magic part is the line:</p>
<pre><code>RUN xcaddy build \
  --with github.com/caddyserver/transform-encoder</code></pre><p>Which pulls the <code>transform-encoder</code> plugin and installs it. Then we are
switching to a "normal" Caddy image and just replacing the binary with our
custom built one.</p>
<p>Now you just need to build and run this Dockerfile locally!</p>
<p><img src="caddy-in-docker-with-common-log/container.jpeg" alt="docker whales" /></p>
<h2 id="caddyfile"><a class="anchor" aria-hidden="true" tabindex="-1" href="#caddyfile"></a>Caddyfile</h2><p>This is the syntax to use it in a
<a href="https://caddyserver.com/docs/caddyfile/concepts#caddyfile-concepts" rel="noopener noreferrer">Caddyfile</a>:</p>
<pre><code>log {
        format transform "{common_log}"
        output file /var/log/homepage.log
    }</code></pre><h1 id="tldr"><a class="anchor" aria-hidden="true" tabindex="-1" href="#tldr"></a>tl;dr</h1><pre><code>docker pull mroggy85/caddy:2.5.2</code></pre><p>See my Docker Hub Page: <a href="https://hub.docker.com/r/mroggy85/caddy" rel="noopener noreferrer">https://hub.docker.com/r/mroggy85/caddy</a></p>
]]></content>
    </entry>
    <entry>
        <title type="html"><![CDATA[iTerm2 Triggers]]></title>
        <id>https://okuno.se/blog/iterm2-triggers</id>
        <link href="https://okuno.se/blog/iterm2-triggers"/>
        <updated>2022-06-22T00:00:00.000Z</updated>
        <summary type="html"><![CDATA['Supercharge your terminal']]></summary>
        <content type="html"><![CDATA[<blockquote>
<p>created using <a href="https://www.craiyon.com/" rel="noopener noreferrer">craiyon.com</a></p>
</blockquote>
<p><a href="https://www.urbandictionary.com/define.php?term=TIL">TIL</a>
about
<a href="https://iterm2.com/documentation-triggers.html">iTerm2 <strong>Triggers</strong></a>
which is a super easy way to super charge your terminal. It's a feature that
let's you highlight text, create links and much more!</p>
<p>You can find it in the settings here:
<img src="iterm2-triggers/iterm2-trigger-settings.jpg" alt="iTerm2 Settings Screenshot" width="1846" height="1078" /></p>
<h2 id="highlight-ip-address"><a class="anchor" aria-hidden="true" tabindex="-1" href="#highlight-ip-address"></a>Highlight IP Address</h2><p>One thing that I have added is to highligh IP Addresses, which makes it very
easy to distinguish addresses when glancing over a log.</p>
<p>Regular Expression:
<code>(\b25[0-5]|\b2[0-4][0-9]|\b[01]?[0-9][0-9]?)(\.(25[0-5]|2[0-4][0-9]|[01]?[0-9][0-9]?)){3}</code></p>
<p><img src="iterm2-triggers/ssh_log.jpg" alt="High Level Diagram" width="1496" height="768" /></p>
<blockquote>
<p>Look at all those hacker attempts... Now in gold color!</p>
</blockquote>
<h2 id="link-to-jira"><a class="anchor" aria-hidden="true" tabindex="-1" href="#link-to-jira"></a>Link to Jira</h2><p>Another nice feature is to add a clickable link to the Jira ticket. For example
when you check the git log you can now directly just shift+click and come
directly to the Jira ticket in the browser.</p>
<ul>
<li>Regular Expression: <code>(?i)wf-\d+</code> (replace "wf" with your Jira project's key)</li>
<li>Action: <code>Make Hyperlink</code></li>
<li>Parameters <code>https://jira.your-company.jp/browse/\0</code> (replace "your-company"
with your company's subdomain)</li>
</ul>
<p><img src="iterm2-triggers/hacker.png" alt="Terminal Hacker" width="256" height="256" /></p>
<blockquote>
<p>created using <a href="https://www.craiyon.com/" rel="noopener noreferrer">craiyon.com</a></p>
</blockquote>
]]></content>
    </entry>
    <entry>
        <title type="html"><![CDATA[Perfect Code]]></title>
        <id>https://okuno.se/blog/perfect-code</id>
        <link href="https://okuno.se/blog/perfect-code"/>
        <updated>2022-06-14T00:00:00.000Z</updated>
        <summary type="html"><![CDATA['The futile persuit of perfect code in a business application.']]></summary>
        <content type="html"><![CDATA[<p>Code that doesn't need change. Code that stand the test of time. Code that is
generic enough that it will serve <em>all</em> future use cases.</p>
<ul>
<li>Why strive for this type of code?</li>
</ul>
<p>We devs are usually both lazy and perfectionists. If we could only write these
perfect pieces of
<a href="https://en.wikipedia.org/wiki/Don't_repeat_yourself">DRY (Do not Repeat
Yourself)</a> business logic and helper function then we can use them as Lego
blocks going forward. Then we could handle any business requirements, new or
changed, <em>in theory</em>.</p>
<p>Having a file with frequent changes is considered a bad thing by a lot of
validation tools. And why is that bad? Because we want to our code to reach a
<em>stable state</em>. <strong>Write and forget</strong>. If we need to go back to the same place
and make a change we missed an opportunity the first time to make it right.</p>
<ul>
<li>We have now wasted time. <em>Right</em>?</li>
</ul>
<p>However, I think this mindset is not very helpful when writing a business
application. <em>Why</em>? Because the <strong>business requirments change all the time</strong>.
The very reason for our code changes. This is nothing new, this is the basis of
the <a href="https://agilemanifesto.org/principles.html">agile methology</a>.
However, the agile mindset is in conflict with the dev mentality and the persuit
of perfect code.</p>
<blockquote>
<p>The reason we code is because we want to achieve something. If we want to
achieve something different we need to change the code.</p>
</blockquote>
<p>We have to embrace the fact that <strong>our code will never be finished</strong>, since the
reason, (business, competition, economy, etc), <em>is ever-changing</em>. This is the
essence of
<a href="https://www.agilealliance.org/agile101/12-principles-behind-the-agile-manifesto/">"embrace
change" (2.) from the agile manifesto</a>. Just follow the logic; The reason we
code is because we want to achieve something. If we want to achieve something
different we need to change the code.</p>
<blockquote>
<p>in order to write good code we need to have good communication with business</p>
</blockquote>
<p>It all comes down to human communication, something that we devs are naturally
bad at. A lot of us devs came to the field because we like to talk to computers
rather than flimsy meat bags. But, in order to write good code we need to have
good communication with business. The quality of code cannot be soly determined
by looking at the code, you have to also look at the purpose it serves. That's
why code analytics tools can easily lead us astray. They don't take business
requirments into consideration. Good code may smell, but if the reason for the
code frequently change, what do u achieve by "fixing" it?</p>
<blockquote>
<p>Generic code only works if we anticipate business changes.</p>
</blockquote>
<p>Writing <em>specific</em> code rather than <em>generic</em> code will help you to quickly
fulfill business requirments. Generic code only works if we anticipate business
changes. While there are many best practices to make generic code it all boils
down to guess-work. To be able to figure out what business wants in the future
is similar to betting. You can take calculated risks with better communications
with business to get a better understanding of upcoming changes.</p>
<p>We are better of if we <strong>concede the notion of perfect code</strong> and instead focus
on easily refactorable, extensible code or even code that can be thrown away.
This goes against programmer culture which glorifies e.g. old Unix programs that
have been around for centuries and doesn't need patches since the are
<em>considered done</em>. <em>Perfect</em>. The author got it right.</p>
<p>While the persuit for perfect code is admirable and true in some sense, it
doesn't serve us as a guiding light. Instead, focusing on the reason will better
guide our coding decision making. And since the reason is ever changing, your
code needs to change with it.</p>
]]></content>
    </entry>
    <entry>
        <title type="html"><![CDATA[The Web3 that we don't need]]></title>
        <id>https://okuno.se/blog/the-web3-we-dont-need</id>
        <link href="https://okuno.se/blog/the-web3-we-dont-need"/>
        <updated>2022-01-12T00:00:00.000Z</updated>
        <summary type="html"><![CDATA['It seems to me like a perfect storm of tech, greed and smart people.']]></summary>
        <content type="html"><![CDATA[<p>In blockchain tech community there are a lot of
<a href="https://mirror.xyz/suzuha.eth/vb5E5lhzmPTcpxOJcz6Q211TDgSvoFwDLA6JSM1V37Q">really
smart people</a> working on very technically sophisticated solutions to very
complex systems and problems. They are trying to fix the issues of today while
anticipating the issues of tomorrow. They also have the financial backing of the
value of the cryptocurrency that is flowing on top of the blockchain technology
they are working on.</p>
<h2 id="we-have-a-communication-issue"><a class="anchor" aria-hidden="true" tabindex="-1" href="#we-have-a-communication-issue"></a>We have a communication issue</h2><blockquote>
<p>What's the value added?</p>
</blockquote>
<p>The tech people only focuses on the technical solution. The financial people
only focuses on the speculation market. Both are pointing in a positive
direction. So from their perspective they can't fathom why they are
<a href="https://blog.mollywhite.net/blockchains-are-not-what-they-say/">receiving
so much criticism.</a></p>
<blockquote>
<p>Yes, blockchain technology is cool, but it does not meet the expectation it
sets on itself.</p>
</blockquote>
<p>The cristism boils down to: <strong>What's the value added?</strong> It seems like the for
the majority of the solutions currently on the market, there would be a
<em>negative</em> value for switching to blockchain technology. There <em>may</em> be a new,
nische, market for blockchain technology. This is were the divide between
blockchain lovers 🥰 and haters 😤 are the greatest. Web3 is pitched to be a
revlutionary technology which is going to replace the current state. This bold
claim requires ground breaking technology. Looking from the outside, there is
nothing that even remotely meets that standard when it comes to blockchain
technology. This is the heart of the issue. Yes, blockchain technology is cool,
but it does not meet the expectation it sets on itself.</p>
<blockquote>
<p>It is a solution in search of a problem.</p>
</blockquote>
<p>The main innovation is the distributed leger. Yes, it removes central control,
<a href="https://moxie.org/2022/01/07/web3-first-impressions.html"> <em>in
theory</em></a>. Yes, it requires more resources than a traditional database, but
that's the trade-off. However, is this a technical solution that is interesting
for most mobile apps, SaaS, social media, websites, games and other technical
services and products out there? No, not really. The current problems are not
solved with this technological innovation. It is a solution in search of a
problem.</p>
<h2 id="cant-separate-blockchain-and-cryptocurrency-speculation"><a class="anchor" aria-hidden="true" tabindex="-1" href="#cant-separate-blockchain-and-cryptocurrency-speculation"></a>Can't Separate Blockchain and Cryptocurrency Speculation</h2><p>I view blockchain technology as separate from the value of cryptocurrency. But,
I don't think they can be separated. They are driving each other forward. The
hype of blockchain leads to an increase in value of cryptocurrency. The
increased value of cryptocurrency leads to an increase to the hype of
blockchain. And the circle goes on... There is a promise of future market
adaptation of blockchain/cryptocurrency technology. This is where web3 comes in.
I want to make a distinction between blockchain and web3. From a technical point
of view it's a suttle one, but from a community point of view it's a
differentiator worth noting.</p>
<h3 id="definition-of-blockchain-technology-and-the-people-working-in-this-space"><a class="anchor" aria-hidden="true" tabindex="-1" href="#definition-of-blockchain-technology-and-the-people-working-in-this-space"></a>Definition of blockchain technology and the people working in this space</h3><p>These are all very smart people, working on a grand vision with high principles.
It's a very admirable cause and an exciting future, if it ever would be
realized. It's a space that has been around for at least 14 years, since Bitcoin
emerged 2008 (I guess you can say it started earlier or later depending on your
definition, but this is what I am going with here). Over the years a lot of
innovations has happened, new blockchains have emerged with different technical
solutions. New solutions on top of blockchains have emerged like smart contracts
and NFTs. Here is where web3 definition stsrts</p>
<h3 id="definition-of-web3"><a class="anchor" aria-hidden="true" tabindex="-1" href="#definition-of-web3"></a>Definition of Web3</h3><p>I see web3 as an evolution of the blockchain and cryptocurrency community. With
a very important addition, the non-techy, financial speculative persons. There
was a realization that a lot of money could be made in this space. Add som fomo
and trending social media posts. All of these people were very influencal. They
had capital and good reputation. But, in order to sustain the flow of cash, the
technology needed to be inflated. Big promises were made that can't be backed up
with the reality of the technology.</p>
<h2 id="possible-future"><a class="anchor" aria-hidden="true" tabindex="-1" href="#possible-future"></a>Possible Future</h2><p>This is my prediction: When investors realize that blockchain and cryptocurrency
will not reach the anticipated market adaption, we will see a meltdown in
investments in companies working on blockchain technology and the hype over
blockchain will be over. Blockchain and cryptocurrency will still be around of
course, but the talk about web3 as the next step in the evolution of the web
will die out. DFi, or "Decentralized Finance" will still be around since that's
the main application of blockchain technology, interacting with the transactions
on the ledger. But, that's the limit and were mass adoptation of blockchain tech
will end.</p>
]]></content>
    </entry>
    <entry>
        <title type="html"><![CDATA[Photo Blog with NextJS, Deno and Syncthing]]></title>
        <id>https://okuno.se/blog/photo-blog-with-nextjs-deno-syncthing</id>
        <link href="https://okuno.se/blog/photo-blog-with-nextjs-deno-syncthing"/>
        <updated>2021-05-16T00:00:00.000Z</updated>
        <summary type="html"><![CDATA['How to create an auto-publishing Photo Blog, powered by Next.js, Deno and Syncthing']]></summary>
        <content type="html"><![CDATA[<h2 id="why-build-a-photo-blog-in-2021"><a class="anchor" aria-hidden="true" tabindex="-1" href="#why-build-a-photo-blog-in-2021"></a>Why build a Photo Blog in 2021?</h2><p>Nowadays Instagram is the standard for photo blogging. I really don't like
Instagram for a number of reasons including giving my data to the Facebook
algorithm, and the whole idea of sharing with everyone by default. I recently
looked into an open source alternative: <a href="https://pixelfed.org/" rel="noopener noreferrer">Pixelfed</a> and
tried out running <a href="https://pixelfed.oskarlindgren.se" rel="noopener noreferrer">my own server</a>. It's a
nice service, but to share my photos with my family and friends the barrier of
entry is too high. Another alternative is to run a Ghost blog, which I have
tried. However, posting a new entry with pictures is pretty tedious and I found
myself not posting as much as I wanted.</p>
<p>What I am trying to achieve is pretty simple: Just a website where each page is
an album with pictures of my everyday life that can be viewed by my close family
and friends, <em>if they want</em>. And the most important: A very very easy way to
publish new photos and albums.</p>
<h2 id="overview"><a class="anchor" aria-hidden="true" tabindex="-1" href="#overview"></a>Overview</h2><p><img src="photo-blog-nextjs-deno-syncthing/high-level-diagram.png" alt="High Level Diagram" width="1320" height="796" /></p>
<p>Technologies used:</p>
<ul>
<li><a href="https://nextjs.org/" rel="noopener noreferrer">Next.js</a></li>
<li><a href="https://deno.land/" rel="noopener noreferrer">Deno</a></li>
<li><a href="https://syncthing.net/" rel="noopener noreferrer">Syncthing</a></li>
</ul>
<p>From an end users perspective there is nothing interesting. Just a website that
connects to an API which serves some images.</p>
<p>From the website admin point of view it gets more interesting. Let's say you
want to upload a new album with some images. Just copy the images on your phone
to the special folder on your phone, wait a couple of seconds and boom! Your new
album has been published! But how does it work?</p>
<h3 id="syncthing---sync-photos"><a class="anchor" aria-hidden="true" tabindex="-1" href="#syncthing---sync-photos"></a>Syncthing - Sync Photos</h3><p>Syncthing is a peer-2-peer file syncing service which doesn't require any
central server like e.g. Dropbox. For this project I have a folder on my server
that is synced with a folder on my smartphone. This can also be synced with
another device if you want to edit/add photos from another device.</p>
<h3 id="deno---serve-photos"><a class="anchor" aria-hidden="true" tabindex="-1" href="#deno---serve-photos"></a>Deno - Serve Photos</h3><p>Deno is the new kid on the block that will eventually replace Node.js. With deno
I built a simple HTTP server, running in a Docker container, that reads from a
mounted folder called <code>files</code>. The endpoint <code>/list</code> will return each folder name
that exists in the main folder. The endpoint <code>/album/:albumName</code> will list all
the images in the given album folder folder. And finally the endpoint
<code>/photo/:albumName/:photoName</code> returns the image.</p>
<p>Look at the <a href="https://github.com/MrOggy85/photo-file-server" rel="noopener noreferrer">code</a></p>
<h3 id="nextjs---show-photos"><a class="anchor" aria-hidden="true" tabindex="-1" href="#nextjs---show-photos"></a>Next.js - Show Photos</h3><p>Next.js is a JS Framework on top of React and Node.js from Vercel. The website
basically have 2 routes. The index route will list the albums. When clicking on
an album the page will list all the photos in the album.</p>
<p>Look at the <a href="https://github.com/MrOggy85/photo-blog" rel="noopener noreferrer">code</a></p>
<h2 id="further-automation"><a class="anchor" aria-hidden="true" tabindex="-1" href="#further-automation"></a>Further Automation</h2><p>To make the deployment easy I am leveraging Vercel to host the frontend and to
auto-deploy on each push to <code>master</code>.</p>
<p>I also setup Docker Hub to listen for pushes to <code>master</code> and auto-publish a new
Docker image. Currently this flow is semi-automated cause I still need to login
to my server and pull the latest image and restart the container.</p>
<h2 id="conclusion"><a class="anchor" aria-hidden="true" tabindex="-1" href="#conclusion"></a>Conclusion</h2><p>That's it! If you follow these steps you now have a photo blog you can share
with your friends and super easily update with new albumbs and photos.</p>
<p>You can find my photo blog here: <a href="https://www2.oskarlindgren.se/photos" rel="noopener noreferrer">https://www2.oskarlindgren.se/photos</a></p>
<p>Repos</p>
<ul>
<li><a href="https://github.com/MrOggy85/photo-file-server" rel="noopener noreferrer">Photo File Server repo</a></li>
<li><a href="https://github.com/MrOggy85/photo-blog" rel="noopener noreferrer">Photo Blog repo</a></li>
</ul>
]]></content>
    </entry>
    <entry>
        <title type="html"><![CDATA[Self-hosting - running your own services]]></title>
        <id>https://okuno.se/blog/self-hosting-running-your-own-services</id>
        <link href="https://okuno.se/blog/self-hosting-running-your-own-services"/>
        <updated>2020-12-31T00:00:00.000Z</updated>
        <summary type="html"><![CDATA['Getting rid of Google, Dropbox, Microsoft and others.']]></summary>
        <content type="html"><![CDATA[<p>What put me on this journey is a couple of factors:</p>
<ul>
<li>Ownership/Control - owning the service (together with the community)</li>
<li>Privacy - owning the data</li>
<li>Learning - opportunity to learn</li>
<li>Stability - no unexpected changes</li>
<li>Reliability - the service will not dissapear (Google graveyard...)</li>
<li>Cost - server cost but no service costs</li>
</ul>
<p>To host your own services is a really good learning opportunity for server
management and security. And as an added bonus you get personal services which
is only used by you and your friends.</p>
<h2 id="how-does-my-server-structure-look-like"><a class="anchor" aria-hidden="true" tabindex="-1" href="#how-does-my-server-structure-look-like"></a>How does my server structure look like?</h2><p><img src="self-hosting-running-your-own-services/portainer_digitalocean_docker.png" alt="Docker logo" width="840" height="387" /></p>
<p>I have two small virtual servers (1 CPU, 1GB RAM each) on
<a href="https://www.digitalocean.com/" rel="noopener noreferrer">Digital Ocean</a> which costs me 15$/month. And I
run all my services with <a href="https://www.docker.com/" rel="noopener noreferrer">Docker</a> to make most use of
each server. Docker also simplifies maintenance drastically since nothing has to
be directly installed on the server. And I use <a href="https://caddyserver.com/" rel="noopener noreferrer">Caddy</a>
as a reverse proxy for easy HTTPS/SSL support and super easy configuration
compared to nginx. This is how my Caddyfile looks like:</p>
<pre><code>oskarlindgren.se {
    redir https://www.oskarlindgren.se{uri}
}

www.oskarlindgren.se {
    root * /usr/share/caddy

    redir /blog /blog/
    reverse_proxy /blog/* http://tech-blog:2368

    redir /photos /photos/
        reverse_proxy /photos/* http://photo-blog:2368

    file_server
}

MASKED.oskarlindgren.se {
    reverse_proxy http://owncloud-docker-server_owncloud_1:8080
}

MASKED.oskarlindgren.se {
    reverse_proxy http://firefly:8080
}

MASKED.oskarlindgren.se {
    reverse_proxy http://freshrss
}

MASKED.oskarlindgren.se {
    reverse_proxy http://fathom:8080
}</code></pre><p>I also recently added a 300GB volume for 30$/month for additional storage.
Primarily to be able to store photos.</p>
<p>Total monthly cost: 45$</p>
<p>This is my price for privacy and learning :)</p>
<h2 id="what-services-do-i-run"><a class="anchor" aria-hidden="true" tabindex="-1" href="#what-services-do-i-run"></a>What services do I run?</h2><h3 id="email---mailu"><a class="anchor" aria-hidden="true" tabindex="-1" href="#email---mailu"></a>Email - <em>Mailu</em></h3><p>Running my own email server may be the most important service I have. The main
reason is privacy. The reason you get email for free from Google and others is
that they are reading your emails and knows who you are communicating with. I
feel that it's a bit creepy. There are some services that offer you privacy, but
you have to trust them and you have to rely on their service. The ultimate
solution is to run your own email server. It's not super easy but there are
multiple projects that give you an easy setup. I use <a href="https://mailu.io/" rel="noopener noreferrer">Mailu</a>
which is a stable email solution.</p>
<p>Update: Even though I ran Mailu without any bigger problems for a while I found
it too tedious to tinker with. Especially for sending email. I now switched to
<a href="https://tutanota.com/" rel="noopener noreferrer">Tutanota</a> which is a ery privacy focues email provider
based in Germany.</p>
<p>I am still using my own domain, and it was easy to allow wild card aliases which
allows me to create email aliases on the fly to have a unique address for each
service I signed up for.</p>
<h3 id="calendar-contacts-documents---owncloud-nextcloud"><a class="anchor" aria-hidden="true" tabindex="-1" href="#calendar-contacts-documents---owncloud-nextcloud"></a>Calendar, Contacts, Documents - <em>Owncloud Nextcloud</em></h3><p>Update: I recently switched from Owncloud to Nextcloud since Nextcloud comes
with batteries included for a personal use.</p>
<p>It's super easy to run <a href="https://nextcloud.com/" rel="noopener noreferrer">Nextcloud</a> (or
<a href="https://owncloud.com/" rel="noopener noreferrer">Owncloud</a>) and let your phone sync your contacts,
calendar and documents from it. And as an extra bonus you can store all your
important documents there instead of in Google Drive or Dropbox.
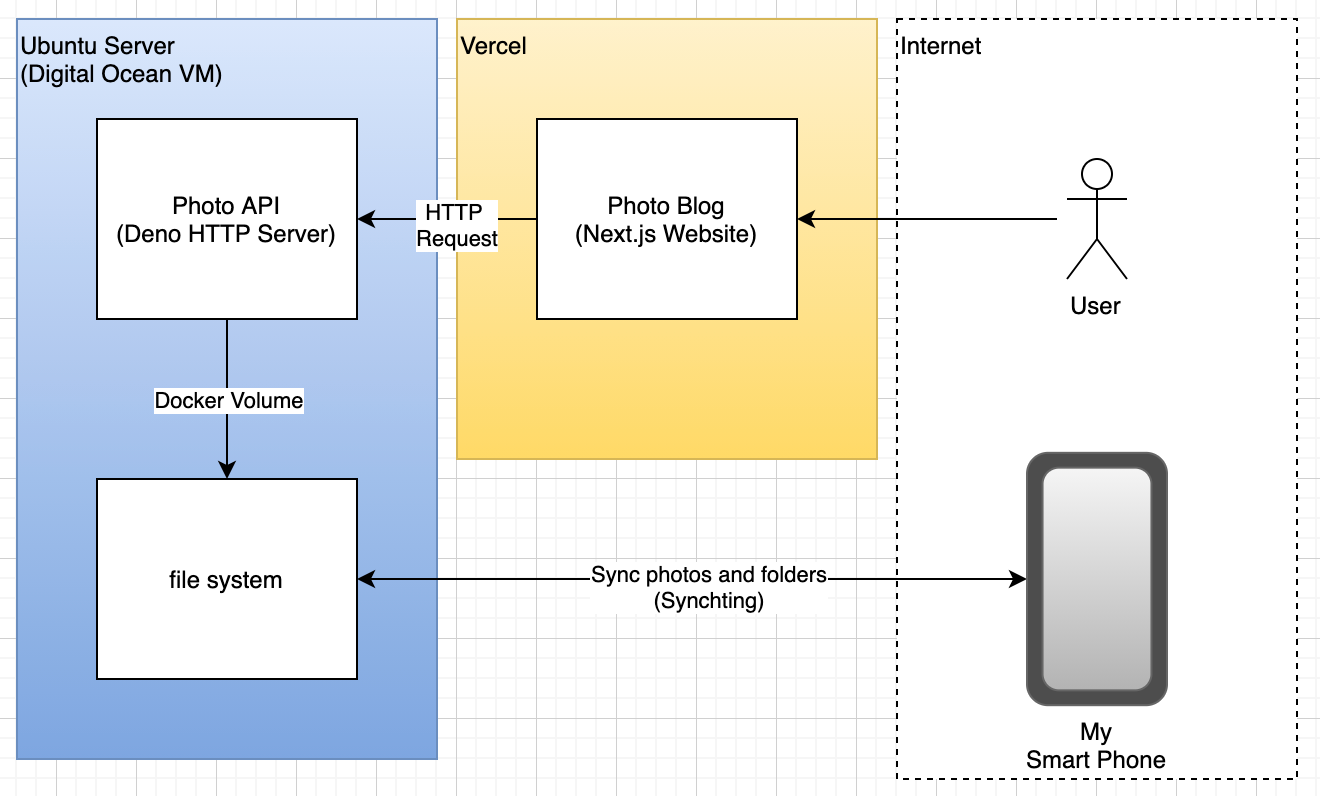
</p>
<h3 id="blog---ghost-nuxt"><a class="anchor" aria-hidden="true" tabindex="-1" href="#blog---ghost-nuxt"></a>Blog - Ghost Nuxt</h3><p>This blog is running on Ghost and hosted on my server Vercel powered by Nuxt.
The analytics is provided by <a href="https://www.fathomhq.com/" rel="noopener noreferrer">Fathom</a> which has a
Lite version you can use for free.</p>
<p>Update: I decided to use a static site generator instead of Ghost. Ghost is well
suited for someone with low technical knowledge, but when you are a developer it
becomes a blocker rather than an enabler. I also don't like the fact that it
relies on a DB. I want something super fast and simple. I got inspired by
<a href="https://derkinzi.de/nuxt-jam-stack/" rel="noopener noreferrer">this article from derkizni</a> and set up
<a href="https://nuxtjs.org/blog/creating-blog-with-nuxt-content" rel="noopener noreferrer">Nuxt</a> using
<a href="https://content.nuxtjs.org/" rel="noopener noreferrer">@nuxt/content</a>.</p>
<h2 id="homepage---caddy"><a class="anchor" aria-hidden="true" tabindex="-1" href="#homepage---caddy"></a>Homepage - <em>Caddy</em></h2><p><img src="oskarlindgren_homepage.png" alt="Screenshot of Homepage" width="984" height="691" /></p>
<figcaption>www.oskarlindgren.se</figcaption>

<p>My homepage is just a HTML file and a CSS file. I tried to keep it light, which
makes it eligible for the <a href="https://250kb.club/" rel="noopener noreferrer">250kb club</a>. Using Caddy to
serve these static files with TLS/SSL support makes it super easy to make
changes through sFTP.</p>
<p>Update: I'm still using Caddy as a reverse proxy for all my self hosted
services. But, I switched to Vercel for my homepage and other frontend because
of the ease of deployment.</p>
<h3 id="photos---photoprism"><a class="anchor" aria-hidden="true" tabindex="-1" href="#photos---photoprism"></a>Photos - <em>PhotoPrism</em></h3><p>I recently started running <a href="https://photoprism.app/" rel="noopener noreferrer">PhotoPrism</a> to organize and
host my photos. It's an alternative to Google Photos and Dropbox which can auto
import your photos and organize them based on Tensorflow and analyzing the image
metadata.</p>
<p>However, PhotoPrism needs at least 2 CPU cores and is very CPU intensive when
ingesting photos so I decided to put it on my local server at home. I tried some
lighter services like Piwigo and Lychee, but they where a bit too light when it
comes to the features I was looking for.</p>
<h3 id="rss-reader---freshrss"><a class="anchor" aria-hidden="true" tabindex="-1" href="#rss-reader---freshrss"></a>RSS Reader - <em>FreshRSS</em></h3><p>To consume blogs, newsletters, etc I use FreshRSS which is a very simple and
light service to keep track of the blogs I like to read. Instead of relying on
an external service like Feedly you can just run your own.</p>
<h3 id="notes-files-and-passwords---syncthing--keepass"><a class="anchor" aria-hidden="true" tabindex="-1" href="#notes-files-and-passwords---syncthing--keepass"></a>Notes, Files and Passwords - <em>Syncthing / KeePass</em></h3><p>I have opted out of any central storage of my files by using
<a href="https://syncthing.net/" rel="noopener noreferrer">Syncthing</a>. Syncthing let's you sync your files
directly to any other device (Note: It doesn't work on iPhone). This is very
convenient to:</p>
<ul>
<li>backup your mobile photos to your server</li>
<li>sync documents between phone and laptop</li>
<li>sync your keepass password file</li>
<li>sync your ssh keys</li>
</ul>
<p>For my notes I just have a folder with markdown files (which I view/edit with
VSCode). Then I can use <a href="https://gsantner.net/project/markor.html" rel="noopener noreferrer">Markor</a> on my
Android phone to easily view and edit my notes.</p>
<p>Previously I used Lastpass, but I switched to <a href="https://keepass.info/" rel="noopener noreferrer">KeePass</a>
since I don't want to store my passwords with someone else. With KeePass and
Syncthing you can achieve the same level of convenience as with Lastpass, but
without the risk of your passwords getting leaked in a hack of Lastpass.</p>
<h2 id="why-do-you-want-to-run-your-own-services"><a class="anchor" aria-hidden="true" tabindex="-1" href="#why-do-you-want-to-run-your-own-services"></a>Why do you want to run your own services?</h2><p>There are a couple of reasons why you want to run your own services.</p>
<h3 id="privacy"><a class="anchor" aria-hidden="true" tabindex="-1" href="#privacy"></a>Privacy</h3><blockquote>
<p><em>You wouldn't give your front door key to your local store owner, right?</em></p>
</blockquote>
<p>When you are giving your data to someone else, they will use it for other
purposes than yours. It's hard to predict what someone else can find out about
you or what they will do to the data once they have it. Normally a service is
run to make money for the owner. This means that they will use your data to
maximize their profit. If the service chooses to try to improve the service
based on your data that could be a net benefit for both of you. However, the
service providers purpose is to make you stay, not to help you. They may try to
game you into staying or even create a wall garden. If you keep your data to
yourself and only share necessary data to specific people you know you will have
a safer life.</p>
<p>Real world example: You wouldn't give your front door key to your local store
owner, right? Even if it would be convenient if they can go in and leave some
groceries in your kitchen, it wouldn't feel safe to let in a stranger in your
home unsupervised...</p>
<h3 id="ownership"><a class="anchor" aria-hidden="true" tabindex="-1" href="#ownership"></a>Ownership</h3><p>It is very convenient to rely on a service to store and organize your data. But,
what happens when the service goes down, or when they decide to shut down
completely. When you run your own service you run it for yourself. The purpose
is to help yourself to organize your life. You will probably not create any of
these solutions from scratch, but rather rely on Open Source and Free Software.
These projects are driver by likeminded people that want to solve a problem and
to let others use it for free.</p>
<p>Of course you have now traded a dependency of a for-profit to a dependency on an
open source service. But, for me I think it's better to be dependent on a free,
open source, right to fork service than a paid, proprietary, closed source
service.</p>
<h3 id="security"><a class="anchor" aria-hidden="true" tabindex="-1" href="#security"></a>Security</h3><blockquote>
<p><em>The probability that you will be a target of a hack is lower than any known
service out there.</em></p>
</blockquote>
<p>
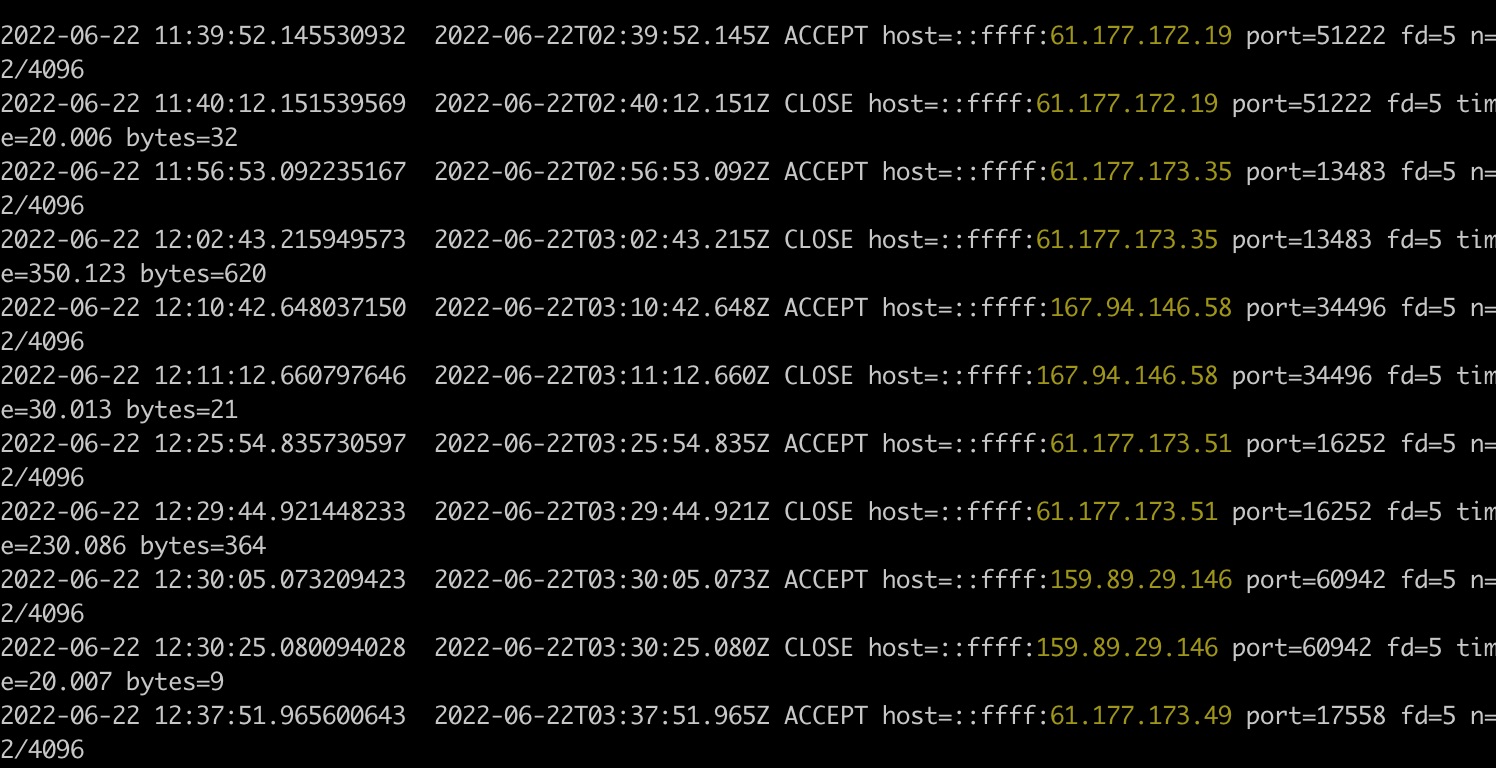
When you run a server that is accessible on the internet you will constantly be
proned by script kiddies. Just make sure you have
<a href="https://www.fail2ban.org/wiki/index.php/Main_Page" rel="noopener noreferrer">Fail2ban</a> setup and that you
don't expose any ports that you don't need to limit attack vectors. The
probability that you will be a target of a hack is lower than any known service
out there. However the top services out there will probably be way better than
you at server security. In the end, as long as you are comfortable with the risk
when running your own services and take proper precautions it should be fine.</p>
<h3 id="backup"><a class="anchor" aria-hidden="true" tabindex="-1" href="#backup"></a>Backup</h3><p>Backup, backup, backup. Even if you rely on a service you should make sure to
backup your data regularly. However, when you run your own it's even more
important to have backups. Make sure you store the backups in another machine.</p>
]]></content>
    </entry>
    <entry>
        <title type="html"><![CDATA[Making a Deno CLI - Learning Japanese Numbers]]></title>
        <id>https://okuno.se/blog/making-a-deno-cli-learning-japanese-numbers</id>
        <link href="https://okuno.se/blog/making-a-deno-cli-learning-japanese-numbers"/>
        <updated>2020-07-27T00:00:00.000Z</updated>
        <summary type="html"><![CDATA['I have been following the evolution of Deno since I first heard about it. I really like node.js and I was playing around with it when it since it was released. ']]></summary>
        <content type="html"><![CDATA[<p>I have been a heavy node user and advocate it for several years now. It's a
really empowering tool for frontend devs like me. Node is still really good and
there is no immediate reason for switching to Deno if you don't see the problems
as presented by the creator, Ryan Dahl:</p>
<div>
<div>


</div>
</div>

<blockquote>
<p><em>“With Deno you get TypeScript as a first class citizen”</em></p>
</blockquote>
<p>Since around 1,5 years ago I have been mainly writing code using TypeScript. I
was hesitant at first since I didn't think types was needed in Javascript until
I started using TypeScript. It really makes writing Javascript Apps a bliss.
With Deno you get TypeScript as a first class citizen. No need for any babel or
typescript compiler setup. Deno will natively support your code. If you also
like typescript and don't like extra setup boilerplate code Deno is for you.</p>
<blockquote>
<p><em>“Deno allows you to get your dependencies from anywhere on the web”</em></p>
</blockquote>
<p>Another reason for using Deno is more of a political one. NPM has grown and are
now part of Microsoft. It is a centralized resource which is a part of the
centralization of the web we have seen in the recent years. Sure, you can still
host your own NPM repository, but by design Node needs to be compatible with
NPM. Deno allows you to get your dependencies from anywhere on the web. If that
is from Github or somewhere else it's totally up to the you and the community.
To be fair, currently most of the libraries are hosted in Github or NPM.</p>
<blockquote>
<p><em>“Talk is cheap. Show me the code.” - Linus Torvalds</em></p>
</blockquote>
<p>That's all about the background of why I like Deno. Let's move on to the code. I
wanted to make a simple app where a number was spoken in Japanese and the user
would guess the number by typing it directly. Writing a simple script executed
in the terminal makes the app very light with no need to create a Web interface
or Desktop application. But, I still wanted the TUI to be nice and snappy so
that the user can go through a lot of numbers fast.</p>
<p>I chose to go with a REPL approach to make the program continue executing until
the user chooses to exit (by ctrl-c). The core of the program is this while
loop:</p>
<pre><code>const buffer = new Uint8Array(1024);

while (true) {
  const input = await Deno.stdin.read(buffer);
  const textRaw = new TextDecoder().decode(buffer.subarray(0, input!));
  const text = textRaw.trim();
  console.log(`you wrote: ${text}`);
}</code></pre><p>Btw, did I mention that Deno supports top-level async/await?</p>
<p>As you can see in the code above. We are simply (a)waiting for the user to input
some text. Then we can decode it and do something with that text. For this app
we want to check if the users guess was the expected number. Let's add some more
code!</p>
<pre><code>const nextNumber = Math.round(Math.random() * maxNumber);

const input = await Deno.stdin.read(buffer);
const textRaw = new TextDecoder().decode(buffer.subarray(0, input!));
const text = textRaw.trim();

const numberGuess = Number(text);
const result = numberGuess === nextNumber;

if (result) {
  console.log("You are correct!");
} else {
  console.log(`Incorrect! The correct number is: ${nextNumber}`);
}</code></pre><p>This will let the user input a guess and then we check against <code>nextNumber</code>.
However as you can see there is an undeclared variable here: <code>maxNumber</code>. This
is an input that the user has to give when starting the program to determine
what range you want to practice on. Deno makes it easy to read the parameters of
a program:</p>
<pre><code>const maxNumberRaw = Deno.args[0];
const maxNumber = Number(maxNumberRaw);
if (Number.isNaN(maxNumber)) {
  console.log("Please start program like this:");
  console.log("./start.sh MAX_NUMBER");
  Deno.exit(0);
}</code></pre><p>But, the user is still not hearing any number! Ok, let's add one of the main
pieces of the program; Let the machine speak! So, this next part assumes that
the user is running a Mac. This can easily be modified to be adapted to Linux
and Windows. I am using the program say to do text-to-speech. This comes
preinstalled on any Mac. Then we can use the Japanese voice to let the number be
spoken in Japanese. To run a command from Deno it's as easy as this:</p>
<pre><code>function sayNumber(number: string) {
  Deno.run({
    cmd: ["say", "-v", "Kyoko", number],
  });
}</code></pre><p>Each string in the array maps to a word written in the terminal. Just be careful
since it's async. If you want to make sure that the command you are executing is
finished before moving on you need to await it.</p>
<p>Now we can add use this function to let the computer speak the number and the
user can guess it. I also added a clear command after each guess to clean up for
the next number. And of course some cute bunnies to emote the result to the
user.</p>
<pre><code>//   /) /)     (\\_/)   (\\-/)
//  ( ^.^ )    (&gt;.&lt;)    (='.'=)
// C(") (")   (")_(")   (")-(")o</code></pre><p>See the full source <a href="https://github.com/MrOggy85/japanese-numbers" rel="noopener noreferrer">here</a>.</p>
<p>Happy coding!</p>
]]></content>
    </entry>
    <entry>
        <title type="html"><![CDATA[Where does "hardcore_einstein" come from?]]></title>
        <id>https://okuno.se/blog/where-does-docker-names-come-from</id>
        <link href="https://okuno.se/blog/where-does-docker-names-come-from"/>
        <updated>2019-10-04T00:00:00.000Z</updated>
        <summary type="html"><![CDATA['Did you ever wonder about how those weird names for docker containers were generated? Probability not, but the more you know!']]></summary>
        <content type="html"><![CDATA[<p>The random name generation comes from this package in the moby repo. There is a
list of adjectives and a list of famous scientists and hackers that gets
randomly combined to form the names of the docker containers we all have come to
love. The combinations are random with one exception of <code>boring_wozniak</code> since
<a href="https://github.com/moby/moby/blob/master/pkg/namesgenerator/names-generator.go#L844" rel="noopener noreferrer"><em>"Steve Wozniak is not boring"</em></a>
according to the comment.</p>
<p>The list is actively maintained and new scientists are added and also removed.
After being accused of sexually abusing trafficking victims, Marvin Minsky was
removed along with Richard Stallman that publicly defended his actions.</p>
<ul>
<li>related article:
<a href="https://frightanic.com/computers/docker-default-container-names/" rel="noopener noreferrer">https://frightanic.com/computers/docker-default-container-names/</a></li>
<li>Image credit:
<a href="https://www.praqma.com/stories/Deploying-to-kubernetes-as-part-of-a-pipeline/" rel="noopener noreferrer">https://www.praqma.com/stories/Deploying-to-kubernetes-as-part-of-a-pipeline/</a></li>
</ul>
]]></content>
    </entry>
    <entry>
        <title type="html"><![CDATA[Evolution of Frontend Devs]]></title>
        <id>https://okuno.se/blog/evolution-of-frontend-devs</id>
        <link href="https://okuno.se/blog/evolution-of-frontend-devs"/>
        <updated>2019-04-01T00:00:00.000Z</updated>
        <summary type="html"><![CDATA["Today the frontend scene is very broad and consist of a range of skills. That means if your main skills are creating a good design with CSS, it doesn't necessarily mean you also can configure webpack to handle Sass files."]]></summary>
        <content type="html"><![CDATA[<p>I recently listened to the podcast Shoptalk episode
<a href="https://shoptalkshow.com/episodes/346/" rel="noopener noreferrer">"Is there a Great Divide"</a> about the
divide between frontend developers. I was not aware that there was a divide in
the first place. The main symptom they discuss is the difference between what a
job listing says and what the actual job is.</p>
<p>This inspired me to think about where frontend development is today. I have
lately also recently seen a divide, but on another topic, when it comes to use
static types and Object Oriented Programming in the frontend. But, let's go back
from the start first to see why we are where we are today.</p>
<p>Disclaimer:<br /> This is a gross simplification of the history of the web and
data has been cherry picked to fit my narrative. There is probably some facts
not mentioned or wrongly described that effects some of my points and I am open
to feedback to adjust my views.</p>
<h2 id="first-gen---world-wide-web-dev"><a class="anchor" aria-hidden="true" tabindex="-1" href="#first-gen---world-wide-web-dev"></a>First Gen - World Wide Web Dev</h2><p><img src="evolution-of-frontend-devs/9407011_31-A5-at-72-dpi.jpg" alt="Sir Timothy Berners-Lee in front of a computer" width="561" height="360" /></p>
<figcaption>source: [Cern](https://cds.cern.ch/record/39437#31)</figcaption>

<p>The information Highway was born at CERN by Tim Beerners-Lee and
<a href="https://en.wikipedia.org/wiki/World_Wide_Web" rel="noopener noreferrer">released to the public in 1991</a>.
At this point every website was just static webpages directly served from the
web servers. Each URL pointed to a specific directory which had an index.html
where you also could point to other sources like css files, images, etc.
Updating the website meant changing the html file, uploading a new version by
ftp and then the users got the new content. After some time the need for a more
dynamic experience led to the introduction of
<a href="https://en.wikipedia.org/wiki/JavaScript#History" rel="noopener noreferrer">Javascript in 1995 by Brendan Eich</a>
and during the same year
<a href="https://en.wikipedia.org/wiki/HTTP_cookie#History" rel="noopener noreferrer">cookies</a> were introduced by
the same state of the art browser at the time: Netscape.</p>
<p>At this point frontend development was not really a known term. Programmers were
able to create html files that could be interpreted by a browser to show a
document. It was mainly used in research and websites where very informative and
non interactive.</p>
<h2 id="second-gen---web-20"><a class="anchor" aria-hidden="true" tabindex="-1" href="#second-gen---web-20"></a>Second Gen - Web 2.0</h2><p><img src="evolution-of-frontend-devs/gilfoyle.jpg" alt="Gilfoyle from Silicon Valley TV Show" width="770" height="434" /></p>
<figcaption>source: <a href="https://www.techrepublic.com/pictures/our-21-favorite-fictional-techies-from-tv-and-movies/">techrepublic.com</a></figcaption>

<blockquote>
<p><em>"I tried to make it slow. I really did. But I'm not Dinesh. It's very
difficult for me to do shitty work." - Gilfoyle</em></p>
</blockquote>
<p>The need for more an even more dynamic experience led
<a href="https://en.wikipedia.org/wiki/PHP#History" rel="noopener noreferrer">Rasmus Lerdorf to, in 1995, create PHP</a>
to be able to serve web pages through a template engine. This led to a
remarkable creativity boost for web development since you could access a
database to tailor the experience of the user and create an html page on the
fly.</p>
<p>But the most important interesting part of this time was that a lot of people
could set up their own website easily thanks to services like e.g. Angelfire,
Geocities, AOL, etc. I think that, the idea that frontend is easy and
unimportant was born during this era. The second half of the 90s can be
summarized by these gifs that frequently was shown on peoples websites:</p>
<p><img src="evolution-of-frontend-devs/HoHollywoodPicture3800construction.gif" alt="Under Contruction GIF" width="467" height="30" />
<img src="evolution-of-frontend-devs/ajaj0077lines_bulletsconstruction.gif" alt="Under Contruction GIF" width="573" height="18" />
<img src="evolution-of-frontend-devs/AtAthens6321underconstruction_lemmings.gif" alt="Under Contruction GIF" width="600" height="32" /></p>
<figcaption>source: http://textfiles.com/underconstruction/</figcaption>

<p><img src="evolution-of-frontend-devs/firebar.gif" alt="Firebar GIF" width="600" height="50" /></p>
<figcaption>source: <a href="https://web.archive.org/web/20090807121959/http://geocities.com/curt_sigurdsen/ALBUM01.htm)">Internet Archive of Curt Sigurdsen's Geocities Webpage</a></figcaption>

<p>This technology would however enable the environment where internet based
business could start to form. And it also led to a specialization between
frontend and backend. The frontend developers was mainly focusing on the design
of the page through html and css with a small portion of Javascript to enable
some dynamic features. And the backend developers would focus on the business
logic of the site.</p>
<p><img src="evolution-of-frontend-devs/bubble_burst.jpg" alt="WWW bubble burst" width="640" height="340" /></p>
<figcaption>source: <a href="https://betanews.com/wp-content/uploads/2014/10/bubble_burst.jpg">betanews.com</a></figcaption>

<p>The web gained a lot of traction during the second half of the 90s and got a
crazy hype which led to the dot-com bubble which
<a href="https://en.wikipedia.org/wiki/Dot-com_bubble#Bursting_of_the_bubble" rel="noopener noreferrer">bursted in 2000</a>.
But, the web was not dead. The technology was still great but the expectations
had to be realigned closer to the reality of what promises the technology and
developers could offer.</p>
<p>During the first decade of 2000 the web became even more dynamic and the term
web 2.0 was coined and got popularized by
<a href="https://en.wikipedia.org/wiki/Web_2.0#Web_2.0" rel="noopener noreferrer">O'Rilley Media in 2004</a>. The web
became a platform for applications and the clients (browsers) started to become
richer. Realtime updates of the website became a big feature.</p>
<p>Now frontend development became more complex. A lot of business logic that was
previously handled by the server was moved to client side to enable user
interaction without the need of a page reload with the use of Ajax calls. There
was also a ton of third party integrations that bloated the global scope and the
css files grew into biblical proportions. And there were still a lot of
differences between browsers which led to
<a href="https://en.wikipedia.org/wiki/JQuery#History" rel="noopener noreferrer">jQuery being born in 2006 by John Resig</a>.</p>
<p><img src="evolution-of-frontend-devs/spaghetti.jpeg" alt="man with spaghetti" width="800" height="1200" /></p>
<figcaption>sauce: <a href="https://medium.com/@orsararecipes/garlic-shrimp-with-linguine-recipe-160a2ab633ac">Pasquale Sciarappa</a></figcaption>

<blockquote>
<p><em>Leave the gun – take the cannoli. - Clemenza</em></p>
</blockquote>
<p>By around 2010 web development was a mess, imho. The server and client code was
a perfect spaghetti carbonara served a million times a second around the globe.
A lot of great developers and organizations started to generalize the solutions
they created and shared them with the community which led to the next generation
of frontend developers.</p>
<h2 id="third-gen---javascript-dev"><a class="anchor" aria-hidden="true" tabindex="-1" href="#third-gen---javascript-dev"></a>Third Gen - Javascript Dev</h2><p><img src="evolution-of-frontend-devs/optimize.jpeg" alt="hipster boy with mac" width="684" height="1024" /></p>
<figcaption>source: <a href="https://www.wwdjapan.com/24925">WWD Japan, Photo by Kuba Dabrowski</a></figcaption>

<blockquote>
<p><em>"...which made frontend development into it's own domain."</em></p>
</blockquote>
<p>In 2010 AngularJS and Backbone was released, followed by Ember the next year.
This was the start of Web Apps which introduced concepts like MVC which were
never used in frontend before. It was also a step back to the first generation
of websites with statically served websites, but a leap forward for dynamic
websites and rich clients. The result was a totally decoupled frontend and
backend which made frontend development into it's own domain. The server didn't
need to serve html and became an Restful API for the frontend to consume
(However the need for a good SEO score later reversed this decision and
introduced server side rendering of the frontend app).</p>
<blockquote>
<p><em>"This would later be known as Javascript fatigue to try to keep up with all
the new stuff."</em></p>
</blockquote>
<p>When the frontend was living in it's own world outside the server a lot of
tooling was invented to handle the need for a rapid development which led to
Grunt, Gulp and Webpack to be introduced. Furthermore NPM became the place to
share libraries, where several new solutions would be published every day. This
would later be known as Javascript fatigue to try to keep up with all the new
stuff. Javascript as a language grew with a lot of new features. But, all
features where not supported by all browsers or not yet finalized which led to
the creation of Babel. As a frontend developer in around 2016 you where expected
to master these tools and to at least have the knowledge of one of the
javascript frameworks out there.</p>
<p>This new frontend development divided the notion of a frontend developer from
the previous era. Being proficient in html and css was not enough to get you
hired anymore. Now programming skills and knowledge about certain frameworks was
what frontend development was all about.</p>
<p>The shift didn't happen over night though. Most companies continued to use their
previous server side template based solutions, but slowly started to convert to
the new javascript frameworks as they matured. As more and more businesses
shifted their tech stack to heavily rely on a Javascript framework, this meant
that more and more of their business logic moved to the frontend.</p>
<blockquote>
<p><em>"...the biggest migration wave in programming history."</em></p>
</blockquote>
<p>This is what I identify as the biggest migration wave in programming history.
Not only a shift in tech stack, but especially for backend developers migrating
to a brand new world. Backend developers that previously only been working on
server side code in statically typed compiled languages now found themselves in
the dynamic and browser interpreted domain of Javascript. And they were far from
happy to find themselves in this country... As Javascript gained traction and
popularity so did the frustration which was popularized by the
<a href="https://www.destroyallsoftware.com/talks/wat" rel="noopener noreferrer">wat presentation in 2012 by Gary Bernhardt</a>.
It's an understatement to say that Javascript as a language did not fit into the
expectations of these developers.</p>
<h2 id="predicted-forth-gen---typescript-dev"><a class="anchor" aria-hidden="true" tabindex="-1" href="#predicted-forth-gen---typescript-dev"></a>(predicted) Forth Gen - Typescript Dev</h2><p><img src="evolution-of-frontend-devs/harvey.jpg" alt="Harvey from Suits TV Show" width="880" height="495" /></p>
<figcaption>source: <a href="https://dave.uktv.co.uk/suits/article/dave-calls-harvey-qa/">UKTV</a></figcaption>

<p>There where several attempts to radically improve Javascript with a superset
language such as
<a href="https://en.wikipedia.org/wiki/CoffeeScript" rel="noopener noreferrer">CoffeeScript, introduced in 2010 by Jeremy Ashkenas</a>,
followed by
<a href="https://en.wikipedia.org/wiki/Dart_(programming_language)#History" rel="noopener noreferrer">Dart in 2011</a>
and
<a href="https://en.wikipedia.org/wiki/Elm_(programming_language)#History" rel="noopener noreferrer">Elm in 2012</a>.
These languages were popular, but never gained any mainstream traction.</p>
<p>Class was introduced in ECMAScript 2015 to the delight of objected oriented
developers, but was imho, vastly misinterpreted since it was only a syntactic
sugar for using the new operator. This however created a big shift in how a lot
of Javascript was written, since the former backend developers were used to
declare classes when coding. There was already an awkward naming convention in
Javascript to use an underscore to mark a method as "private", when in reality
it was accessible publicly. This remained a practice even after class was
introduced, since it didn't actually change the underlying language.</p>
<p>There was however still a big annoyance with Javascript: The lack of static
types. Enter: TypeScript by Microsoft. The first version of
<a href="https://en.wikipedia.org/wiki/TypeScript#History" rel="noopener noreferrer">TypeScript was released 2012</a>,
but it wasn't until after ECMAScript 2015 and
<a href="https://en.wikipedia.org/wiki/Angular_(web_framework)#Version_2" rel="noopener noreferrer">Angular 2 which was officially released in 2016</a>,
until it gained some serious traction of the community. Typescript became the
standard way of writing Angular apps. Facebook had their own way of doing static
type checking in React with Flow, but it never went mainstream and now a lot of
development is now done with Typescript.
<a href="https://vuejs.org/v2/guide/typescript.html" rel="noopener noreferrer">Vue added Typescript support from version 2</a>
and in their next version will be
<a href="https://medium.com/the-vue-point/plans-for-the-next-iteration-of-vue-js-777ffea6fabf" rel="noopener noreferrer">written in Typescript and be a first class citizen</a>.
The Javascript community embraced Typescript during 2018 and more and more
libraries bundled type definitions and wrote their libraries using Typescript.</p>
<h2 id="the-future-of-frontend-development"><a class="anchor" aria-hidden="true" tabindex="-1" href="#the-future-of-frontend-development"></a>The Future of Frontend Development</h2><p>The web browser is today a synonym to Chrome. The
<a href="https://en.wikipedia.org/wiki/Browser_wars" rel="noopener noreferrer">Browser Wars</a> are over and Chromium
is the victor. Microsoft's decision to shift Edge to be Chromium based is a
proof that the game has changed. The only odd sheep left on the battlefield is
Firefox and Safari, but they can't currently put up a fight.</p>
<p>Google had plans to introduce Dart as a replacement for Javascript in the
browser, but
<a href="https://techcrunch.com/2015/03/25/google-will-not-integrate-its-dart-programming-language-into-chrome/" rel="noopener noreferrer">cancelled those plans in 2015</a>.
During this time Dart was not by any means a popular language and Chrome was
still not the dominant browser as it is today. But, today the environment has
changed. All the ingredients that wasn't present before is now in place. I
predict that during 2019 there will be a first version of Edge and Chrome that
supports Typescript native in the browser.</p>
<p>Being a frontend developer in the 2020s will be indistinguishable from a backend
developer. The wild wild west of frontend development has an expiration date
which will come sooner than we expect. Be prepared for the change.</p>
<p>Sources:</p>
<ul>
<li><a href="https://shoptalkshow.com/episodes/346/" rel="noopener noreferrer">https://shoptalkshow.com/episodes/346/</a></li>
<li><a href="https://en.wikipedia.org/wiki/World_Wide_Web" rel="noopener noreferrer">https://en.wikipedia.org/wiki/World_Wide_Web</a></li>
<li><a href="https://en.wikipedia.org/wiki/JavaScript#History" rel="noopener noreferrer">https://en.wikipedia.org/wiki/JavaScript#History</a></li>
<li><a href="https://en.wikipedia.org/wiki/HTTP_cookie#History" rel="noopener noreferrer">https://en.wikipedia.org/wiki/HTTP_cookie#History</a></li>
<li><a href="https://en.wikipedia.org/wiki/PHP#History" rel="noopener noreferrer">https://en.wikipedia.org/wiki/PHP#History</a></li>
<li><a href="https://en.wikipedia.org/wiki/Dot-com_bubble#Bursting_of_the_bubble" rel="noopener noreferrer">https://en.wikipedia.org/wiki/Dot-com_bubble#Bursting_of_the_bubble</a></li>
<li><a href="https://en.wikipedia.org/wiki/Web_2.0#Web_2.0" rel="noopener noreferrer">https://en.wikipedia.org/wiki/Web_2.0#Web_2.0</a></li>
<li><a href="https://en.wikipedia.org/wiki/JQuery#History" rel="noopener noreferrer">https://en.wikipedia.org/wiki/JQuery#History</a></li>
<li><a href="https://en.wikipedia.org/wiki/AngularJS" rel="noopener noreferrer">https://en.wikipedia.org/wiki/AngularJS</a></li>
<li><a href="https://en.wikipedia.org/wiki/Backbone.js" rel="noopener noreferrer">https://en.wikipedia.org/wiki/Backbone.js</a></li>
<li><a href="https://en.wikipedia.org/wiki/Ember.js#History" rel="noopener noreferrer">https://en.wikipedia.org/wiki/Ember.js#History</a></li>
<li><a href="https://www.destroyallsoftware.com/talks/wat" rel="noopener noreferrer">https://www.destroyallsoftware.com/talks/wat</a></li>
<li><a href="https://en.wikipedia.org/wiki/CoffeeScript" rel="noopener noreferrer">https://en.wikipedia.org/wiki/CoffeeScript</a></li>
<li><a href="https://en.wikipedia.org/wiki/Dart_(programming_language)#History" rel="noopener noreferrer">https://en.wikipedia.org/wiki/Dart_(programming_language)#History</a></li>
<li><a href="https://en.wikipedia.org/wiki/Elm_(programming_language)#History" rel="noopener noreferrer">https://en.wikipedia.org/wiki/Elm_(programming_language)#History</a></li>
<li><a href="https://en.wikipedia.org/wiki/TypeScript#History" rel="noopener noreferrer">https://en.wikipedia.org/wiki/TypeScript#History</a></li>
<li><a href="https://en.wikipedia.org/wiki/Angular_(web_framework)#Version_2" rel="noopener noreferrer">https://en.wikipedia.org/wiki/Angular_(web_framework)#Version_2</a></li>
<li><a href="https://techcrunch.com/2015/03/25/google-will-not-integrate-its-dart-programming-language-into-chrome/" rel="noopener noreferrer">https://techcrunch.com/2015/03/25/google-will-not-integrate-its-dart-programming-language-into-chrome/</a></li>
</ul>
]]></content>
    </entry>
    <entry>
        <title type="html"><![CDATA[Setup a Private NPM Registry with Verdaccio and Docker]]></title>
        <id>https://okuno.se/blog/private-npm-registry-with-verdaccio-2-2</id>
        <link href="https://okuno.se/blog/private-npm-registry-with-verdaccio-2-2"/>
        <updated>2019-01-14T00:00:00.000Z</updated>
        <summary type="html"><![CDATA["When collaborating on frontend application writing component libraries our companies doesn't always want to share that code with the community (boo!). Using package managers like npm and yarn is really powerful to handle our third party code. When working locally it's easy to use npm link or yarn link for ease of development. Then when we want to use our library with our application we need to provide a repo link with a tag and auth token (ugly and unsafe!). Let's do it proper by publishing our library to our own NPM registry instead! And also get an additional cache layer in case NPM is down..."]]></summary>
        <content type="html"><![CDATA[<p>Before moving on. If you don't want to host your own NPM Registry you can just
use NPM's own solution for 7$ per user: <a href="https://www.npm-enterprise.com/" rel="noopener noreferrer">https://www.npm-enterprise.com/</a></p>
<p>Still interested? Let's start!</p>
<p>Note: This setup is written for:</p>
<pre><code>Ubuntu 18.04
Docker version 18.09.0, build 4d60db4
docker-compose version 1.21.2, build a133471</code></pre><p>It will probably be compatible with Mac and other Linux distros though.</p>
<p>We will use docker and docker-compose. If you haven't installed them already
please download and install them here: <a href="https://www.docker.com/get-started" rel="noopener noreferrer">https://www.docker.com/get-started</a></p>
<h2 id="what-is-a-npm-registry"><a class="anchor" aria-hidden="true" tabindex="-1" href="#what-is-a-npm-registry"></a>What is a NPM Registry?</h2><p>It actually turns out that NPM has a pretty simple structure. You can just roll
your own with a Node.js server and a CouchDB instance and follow the
instructions from NPM: <a href="https://docs.npmjs.com/misc/registry" rel="noopener noreferrer">https://docs.npmjs.com/misc/registry</a></p>
<h2 id="a-better-alternative-verdaccio"><a class="anchor" aria-hidden="true" tabindex="-1" href="#a-better-alternative-verdaccio"></a>A better alternative: Verdaccio</h2><p>But, who wants to reinvent the wheel if we already have a Ferrari available with
minimal setup? Let me introduce you to Verdaccio; "a lightweight private npm
proxy registry" which is a pretty damn good description. It's a node.js server
with a simple file based db, but you can also configure it to store your
packages in a Amazon S3 bucket or Google Cloud Storage.</p>
<h2 id="verdaccio-with-docker-compose"><a class="anchor" aria-hidden="true" tabindex="-1" href="#verdaccio-with-docker-compose"></a>Verdaccio with Docker-Compose</h2><p>We want to run Verdaccio as a docker container for ease of deployment. You can
find the latest Dockerfile here. We will use Verdaccio version 3, which is the
latest as of writing this blog post. First of, let's create a docker-compose.yml
file and fill it with this content:</p>
<pre><code>version: '3.1'

services:
  verdaccio:
    container_name: 'verdaccio'
    image: verdaccio/verdaccio:3.0.0
    restart: always
    ports:
      - "4873:4873"
    volumes:
      - ./data:/verdaccio/
    networks:
      - docker-network

networks:
  docker-network:
driver: bridge</code></pre><p>Note that we are mounting a volume called "data". This is where Verdaccio stores
packages and users. We want to store this on the host to be able to persist all
data when restarting our docker container. Let's create the data folder.</p>
<pre><code>~$ mkdir data</code></pre><p>Verdaccio is running inside the Docker Container with it's own user <code>verdaccio</code>
and usergroup <code>verdaccio</code>. You need to give permission to your System's
<strong>Network Management</strong> service to make changes in the folder. Let's create the
data folder and set the correct permissions.</p>
<pre><code>~$ sudo chown -R systemd-network data/</code></pre><p>That's it! Let's fire up this bad boy!</p>
<pre><code>~$ docker-compose up -d</code></pre><p>You can now access it on <code>http://localhost:4873</code></p>
<h2 id="configuring-verdaccio"><a class="anchor" aria-hidden="true" tabindex="-1" href="#configuring-verdaccio"></a>Configuring Verdaccio</h2><p>The config file <code>data/conf/config.yaml</code> holds the configuration.</p>
<p>Docs: <a href="https://verdaccio.org/docs/en/configuration" rel="noopener noreferrer">https://verdaccio.org/docs/en/configuration</a></p>
<h2 id="basic-usage"><a class="anchor" aria-hidden="true" tabindex="-1" href="#basic-usage"></a>Basic Usage</h2><p>Point your npm cli to Verdaccio</p>
<pre><code>~$ npm set registry http://localhost:4873</code></pre><p>Add yourself as a user</p>
<pre><code>~$ npm adduser --registry http://localhost:4873</code></pre><p>Now you can use npm as usual but everything will be proxied through Verdaccio.
Have fun coding!</p>
<p>Full source at Github: <a href="https://github.com/MrOggy85/verdaccio-docker" rel="noopener noreferrer">https://github.com/MrOggy85/verdaccio-docker</a></p>
]]></content>
    </entry>
    <entry>
        <title type="html"><![CDATA[Creating a 8 bit Retro CV Page]]></title>
        <id>https://okuno.se/blog/creating-a-8-bit-retro-cv-page</id>
        <link href="https://okuno.se/blog/creating-a-8-bit-retro-cv-page"/>
        <updated>2018-12-30T00:00:00.000Z</updated>
        <summary type="html"><![CDATA[I grow up playing SNES (スーパーファミコン) and Sega Mega Drive (メガドライブ). My love for pixel graphic games are absolute. Therefore it made sense for me to build a website in that style to represent me as the geek I was growing up and the person that I still am.]]></summary>
        <content type="html"><![CDATA[<p>One of my first games I ever played was Sonic. The old sonic games for Sega Mega
Drive has aged well and are still really enjoyable. In that spirit I decided an
afternoon to have a page that had a side scrolling background with some basic
information. Basically just some links to LinkedIn and Github where my real CV
is :)</p>
<p>My initial inspiration for the page was when I stumbled upon
<a href="https://nostalgic-css.github.io/NES.css/" rel="noopener noreferrer">NES.css</a> from reading the
<a href="https://frontendfoc.us/issues/371" rel="noopener noreferrer">Frontend Focus newsletter</a>. It was so simple
and elegant and really touch my childish self. I just had to use it for a
project. And why not use that style for a CV page?</p>
<h2 id="create-a-profile-card"><a class="anchor" aria-hidden="true" tabindex="-1" href="#create-a-profile-card"></a>Create a Profile Card</h2><p>Add the NES.css to your <code>&lt;head&gt;</code></p>
<div class="highlight notranslate"><pre><span class="token tag"><span class="token tag"><span class="token punctuation">&lt;</span>link</span> <span class="token attr-name">href</span><span class="token"><span class="token punctuation">=</span><span class="token punctuation">"</span>https://unpkg.com/nes.css@0.0.2/css/nes.min.css<span class="token punctuation">"</span></span> <span class="token attr-name">rel</span><span class="token"><span class="token punctuation">=</span><span class="token punctuation">"</span>stylesheet<span class="token punctuation">"</span></span> <span class="token punctuation">/&gt;</span></span></pre></div><p>The next step is to create a container with a title using the NES.css framework.</p>
<div class="highlight notranslate"><pre><span class="token tag"><span class="token tag"><span class="token punctuation">&lt;</span>section</span> <span class="token attr-name">class</span><span class="token"><span class="token punctuation">=</span><span class="token punctuation">"</span>container with-title<span class="token punctuation">"</span></span><span class="token punctuation">&gt;</span></span>
  <span class="token tag"><span class="token tag"><span class="token punctuation">&lt;</span>h2</span> <span class="token attr-name">class</span><span class="token"><span class="token punctuation">=</span><span class="token punctuation">"</span>title<span class="token punctuation">"</span></span><span class="token punctuation">&gt;</span></span>Oskar<span class="token tag"><span class="token tag"><span class="token punctuation">&lt;/</span>h2</span><span class="token punctuation">&gt;</span></span>
<span class="token tag"><span class="token tag"><span class="token punctuation">&lt;/</span>section</span><span class="token punctuation">&gt;</span></span></pre></div><p>Then I will add a row with my Github picture and a encouraging text to navigate
some of the sites where I actually have some content to show.</p>
<div class="highlight notranslate"><pre><span class="token tag"><span class="token tag"><span class="token punctuation">&lt;</span>section</span> <span class="token attr-name">class</span><span class="token"><span class="token punctuation">=</span><span class="token punctuation">"</span>container with-title<span class="token punctuation">"</span></span><span class="token punctuation">&gt;</span></span>
    <span class="token tag"><span class="token tag"><span class="token punctuation">&lt;</span>h2</span> <span class="token attr-name">class</span><span class="token"><span class="token punctuation">=</span><span class="token punctuation">"</span>title<span class="token punctuation">"</span></span><span class="token punctuation">&gt;</span></span>Oskar<span class="token tag"><span class="token tag"><span class="token punctuation">&lt;/</span>h2</span><span class="token punctuation">&gt;</span></span>
    <span class="token tag"><span class="token tag"><span class="token punctuation">&lt;</span>div</span> <span class="token attr-name">class</span><span class="token"><span class="token punctuation">=</span><span class="token punctuation">"</span>row<span class="token punctuation">"</span></span><span class="token punctuation">&gt;</span></span>
    <span class="token tag"><span class="token tag"><span class="token punctuation">&lt;</span>img</span> <span class="token attr-name">src</span><span class="token"><span class="token punctuation">=</span><span class="token punctuation">"</span>https://avatars0.githubusercontent.com/u/2677573?s=460&amp;v=4<span class="token punctuation">"</span></span> <span class="token attr-name">alt</span><span class="token"><span class="token punctuation">=</span><span class="token punctuation">"</span>profile picture<span class="token punctuation">"</span></span> <span class="token attr-name">width</span><span class="token"><span class="token punctuation">=</span><span class="token punctuation">"</span>100<span class="token punctuation">"</span></span> <span class="token attr-name">height</span><span class="token"><span class="token punctuation">=</span><span class="token punctuation">"</span>100<span class="token punctuation">"</span></span> <span class="token punctuation">/&gt;</span></span>
    <span class="token tag"><span class="token tag"><span class="token punctuation">&lt;</span>div</span> <span class="token"><span class="token attr-name">style</span><span class="token"><span class="token punctuation">=</span><span class="token punctuation">"</span><span class="token"><span class="token property">margin-left</span><span class="token punctuation">:</span>28px<span class="token punctuation">;</span></span><span class="token punctuation">"</span></span></span><span class="token punctuation">&gt;</span></span>
        <span class="token tag"><span class="token tag"><span class="token punctuation">&lt;</span>p</span><span class="token punctuation">&gt;</span></span>
              Hello!
        <span class="token tag"><span class="token tag"><span class="token punctuation">&lt;/</span>p</span><span class="token punctuation">&gt;</span></span>
        <span class="token tag"><span class="token tag"><span class="token punctuation">&lt;</span>p</span><span class="token punctuation">&gt;</span></span>
              Please check me out on Github and LinkedIn or follow me on Twitter.
        <span class="token tag"><span class="token tag"><span class="token punctuation">&lt;/</span>p</span><span class="token punctuation">&gt;</span></span>
        <span class="token tag"><span class="token tag"><span class="token punctuation">&lt;/</span>div</span><span class="token punctuation">&gt;</span></span>
    <span class="token tag"><span class="token tag"><span class="token punctuation">&lt;/</span>div</span><span class="token punctuation">&gt;</span></span>
<span class="token tag"><span class="token tag"><span class="token punctuation">&lt;/</span>section</span><span class="token punctuation">&gt;</span></span>

#styles.css
.row {
  display: flex;
  flex-direction: row;
}</pre></div><p>The next row will be a list of icons with links to the services I want the
visitors to navigate to</p>
<div class="highlight notranslate"><pre><span class="token tag"><span class="token tag"><span class="token punctuation">&lt;</span>div</span> <span class="token attr-name">class</span><span class="token"><span class="token punctuation">=</span><span class="token punctuation">"</span>row right-aligned<span class="token punctuation">"</span></span><span class="token punctuation">&gt;</span></span>
     <span class="token tag"><span class="token tag"><span class="token punctuation">&lt;</span>a</span> <span class="token attr-name">href</span><span class="token"><span class="token punctuation">=</span><span class="token punctuation">"</span>https://github.com/MrOggy85<span class="token punctuation">"</span></span> <span class="token"><span class="token attr-name">style</span><span class="token"><span class="token punctuation">=</span><span class="token punctuation">"</span><span class="token"><span class="token property">margin-right</span><span class="token punctuation">:</span>5px</span><span class="token punctuation">"</span></span></span><span class="token punctuation">&gt;</span></span>
         <span class="token tag"><span class="token tag"><span class="token punctuation">&lt;</span>i</span> <span class="token attr-name">class</span><span class="token"><span class="token punctuation">=</span><span class="token punctuation">"</span>icon github is-medium<span class="token punctuation">"</span></span><span class="token punctuation">&gt;</span></span><span class="token tag"><span class="token tag"><span class="token punctuation">&lt;/</span>i</span><span class="token punctuation">&gt;</span></span>
     <span class="token tag"><span class="token tag"><span class="token punctuation">&lt;/</span>a</span><span class="token punctuation">&gt;</span></span>
     <span class="token tag"><span class="token tag"><span class="token punctuation">&lt;</span>a</span> <span class="token attr-name">href</span><span class="token"><span class="token punctuation">=</span><span class="token punctuation">"</span>https://twitter.com/oskarlindgren<span class="token punctuation">"</span></span> <span class="token"><span class="token attr-name">style</span><span class="token"><span class="token punctuation">=</span><span class="token punctuation">"</span><span class="token"><span class="token property">margin-right</span><span class="token punctuation">:</span>5px</span><span class="token punctuation">"</span></span></span><span class="token punctuation">&gt;</span></span>
         <span class="token tag"><span class="token tag"><span class="token punctuation">&lt;</span>i</span> <span class="token attr-name">class</span><span class="token"><span class="token punctuation">=</span><span class="token punctuation">"</span>icon twitter is-medium<span class="token punctuation">"</span></span><span class="token punctuation">&gt;</span></span><span class="token tag"><span class="token tag"><span class="token punctuation">&lt;/</span>i</span><span class="token punctuation">&gt;</span></span>
     <span class="token tag"><span class="token tag"><span class="token punctuation">&lt;/</span>a</span><span class="token punctuation">&gt;</span></span>
     <span class="token tag"><span class="token tag"><span class="token punctuation">&lt;</span>a</span> <span class="token attr-name">href</span><span class="token"><span class="token punctuation">=</span><span class="token punctuation">"</span>https://www.linkedin.com/in/oskarlindgren/<span class="token punctuation">"</span></span><span class="token punctuation">&gt;</span></span>
         <span class="token tag"><span class="token tag"><span class="token punctuation">&lt;</span>img</span> <span class="token attr-name">src</span><span class="token"><span class="token punctuation">=</span><span class="token punctuation">"</span>assets/linkedin.png<span class="token punctuation">"</span></span> <span class="token attr-name">width</span><span class="token"><span class="token punctuation">=</span><span class="token punctuation">"</span>48<span class="token punctuation">"</span></span> <span class="token attr-name">height</span><span class="token"><span class="token punctuation">=</span><span class="token punctuation">"</span>48<span class="token punctuation">"</span></span> <span class="token punctuation">/&gt;</span></span>
     <span class="token tag"><span class="token tag"><span class="token punctuation">&lt;/</span>a</span><span class="token punctuation">&gt;</span></span>
<span class="token tag"><span class="token tag"><span class="token punctuation">&lt;/</span>div</span><span class="token punctuation">&gt;</span></span>

#styles.css
.right-aligned {
  justify-content: flex-end;
}</pre></div><p>The result:</p>
<p><img src="cv_homepage_card.png" alt="CV Homepage Card" width="598" height="233" /></p>
<figcaption>NES style!!!</figcaption>

<p>Okay so that very informative and pretty cool. But, it's not very engaging. I
needed some kind of visually stunning effect in the same spirit. I needed a side
scrolling background!</p>
<h2 id="creating-a-3-layer-side-scrolling-background"><a class="anchor" aria-hidden="true" tabindex="-1" href="#creating-a-3-layer-side-scrolling-background"></a>Creating a 3 layer Side Scrolling Background</h2><p>To create a good depth perception 3 level of backgrounds scrolling at different
speeds is good enough. And we can achieve this with only CSS.</p>
<p>First the HTML</p>
<div class="highlight notranslate"><pre><span class="token tag"><span class="token tag"><span class="token punctuation">&lt;</span>div</span> <span class="token attr-name">class</span><span class="token"><span class="token punctuation">=</span><span class="token punctuation">"</span>wrapper<span class="token punctuation">"</span></span><span class="token punctuation">&gt;</span></span>
    <span class="token tag"><span class="token tag"><span class="token punctuation">&lt;</span>div</span> <span class="token attr-name">class</span><span class="token"><span class="token punctuation">=</span><span class="token punctuation">"</span>mountains<span class="token punctuation">"</span></span><span class="token punctuation">&gt;</span></span><span class="token tag"><span class="token tag"><span class="token punctuation">&lt;/</span>div</span><span class="token punctuation">&gt;</span></span>
    <span class="token tag"><span class="token tag"><span class="token punctuation">&lt;</span>div</span> <span class="token attr-name">class</span><span class="token"><span class="token punctuation">=</span><span class="token punctuation">"</span>trees<span class="token punctuation">"</span></span><span class="token punctuation">&gt;</span></span><span class="token tag"><span class="token tag"><span class="token punctuation">&lt;/</span>div</span><span class="token punctuation">&gt;</span></span>
    <span class="token tag"><span class="token tag"><span class="token punctuation">&lt;</span>div</span> <span class="token attr-name">class</span><span class="token"><span class="token punctuation">=</span><span class="token punctuation">"</span>grass<span class="token punctuation">"</span></span><span class="token punctuation">&gt;</span></span><span class="token tag"><span class="token tag"><span class="token punctuation">&lt;/</span>div</span><span class="token punctuation">&gt;</span></span>
<span class="token tag"><span class="token tag"><span class="token punctuation">&lt;/</span>div</span><span class="token punctuation">&gt;</span></span></pre></div><p>For the background images I found some really nice pictures at a Fandom site
called
<a href="http://supermariobrothersx.wikia.com/wiki/SMB2_Backgrounds" rel="noopener noreferrer">Super Mario Bros X Wiki</a>.
I needed to adapt the pictures a little bit since the image will repeat 3 times
at the x axis to create the illusion of scrolling (if you have a really wide
picture you don't need this).</p>
<p>To accomplish the scrolling effect we will use <code>animation</code> and <code>@keyframes</code>.
Let's start with the first layer which will be the mountains in the far back.</p>
<div class="highlight notranslate"><pre><span class="token">.mountains</span> <span class="token punctuation">{</span>
  <span class="token property">position</span><span class="token punctuation">:</span>absolute<span class="token punctuation">;</span>
  <span class="token property">top</span><span class="token punctuation">:</span>0<span class="token punctuation">;</span>
  <span class="token property">bottom</span><span class="token punctuation">:</span>0<span class="token punctuation">;</span>
  <span class="token property">left</span><span class="token punctuation">:</span>0<span class="token punctuation">;</span>
  <span class="token property">right</span><span class="token punctuation">:</span>0<span class="token punctuation">;</span>
  <span class="token property">background</span><span class="token punctuation">:</span><span class="token"><span class="token function">url</span><span class="token punctuation">(</span><span class="token string">'assets/mountains.gif'</span><span class="token punctuation">)</span></span><span class="token punctuation">;</span>
  <span class="token property">background-repeat</span><span class="token punctuation">:</span> repeat-x<span class="token punctuation">;</span>
  <span class="token property">animation</span><span class="token punctuation">:</span> mountains-slide 60s linear infinite<span class="token punctuation">;</span>
  <span class="token property">width</span><span class="token punctuation">:</span> 3072px<span class="token punctuation">;</span>
<span class="token punctuation">}</span>

<span class="token"><span class="token">@keyframes</span> mountains-slide</span><span class="token punctuation">{</span>
  <span class="token">0%</span><span class="token punctuation">{</span>
    <span class="token property">transform</span><span class="token punctuation">:</span> <span class="token function">translate3d</span><span class="token punctuation">(</span>0<span class="token punctuation">,</span> 0<span class="token punctuation">,</span> 0<span class="token punctuation">)</span><span class="token punctuation">;</span>
  <span class="token punctuation">}</span>
  <span class="token">100%</span><span class="token punctuation">{</span>
    <span class="token property">transform</span><span class="token punctuation">:</span> <span class="token function">translate3d</span><span class="token punctuation">(</span>-1024px<span class="token punctuation">,</span> 0<span class="token punctuation">,</span> 0<span class="token punctuation">)</span><span class="token punctuation">;</span>
  <span class="token punctuation">}</span>
<span class="token punctuation">}</span></pre></div><p>The <code>width</code> is 3 times the image width size and the <code>translate3d</code> property tells
it to move to the left and repeat infinitely. That's all there is to it. Then
you can just add as much layers as you want, position them absolutely and
experiment with the animation speed to create different velocity to get that
depth perception we are trying to achieve here.</p>
<p>The end result:</p>
<p><img src="oskarlindgren_website.gif" alt="website preview" width="1030" height="696" /></p>
<figcaption>Scrolling like a beauty</figcaption>

<p>View the full source at <a href="https://github.com/MrOggy85/homepage" rel="noopener noreferrer">Github</a>.</p>
<p>Checkout it out live at <a href="https://www.oskarlindgren.se" rel="noopener noreferrer">https://www.oskarlindgren.se</a></p>
]]></content>
    </entry>
</feed>